PN&T 1 — Film Cameras
Photography Now & Then
(PN&T) is a personal journey about cameras, lenses, films and digital imaging I have used since 1980
Proudly and defiantly, no AI was used to create this article
(When citing this article, please use photonat.4020.net
)
| Topic | Description |
|---|---|
| Early Cameras | Film cameras used during high school and univeristy |
| Rolleiflex T | Medium format 6×6 fixed lens TLR |
| Mamiya RB67 Pro–S | Medium format 6×7 “Texas Hasselblad” |
| Mamiya C330 Profressional | Medium format 6×6 TLR with interchangeable lenses |
| Hasselblad V Series | Medium format 6×6 501CM, 500EL/M & Flexbody |
| 135 cameras | 35mm film cameras: Leica R9, Nikon F3/T, Nikon F5, Leica IIIG & Leica M6 TTL |
| Stories | Rolleiflex T sale • Alfa Romeo badge |
Introduction
I was never a full–time professional photographer nor even trained as one. Instead, I have always had regular employment in areas competely unrelated to photography.
Yet I have also done dozens of professional shoots since the early 1980s, either via one–off commissions or repeat work for clients as varied as Bausch + Lomb, Spike Wireless, Sydney Morning Herald, Warner Bros Theatrical, Hewlett Packard, Lion Nathan Brewers, University of Wollongong, GM Holden Australia, The Australian War Memorial, Brett Whiteley Stuidos and The Australian National Maritime Museum.
During 2024–5 I wrote a couple of personal monographs about photoshoots I did from 1980–91, to accompany high resolution scans of the original films. Although my articles dealt mainly with the photos and people involved, the more I wrote, the more intrigued I became about the techniques and technical aspects involved. In particular I became fascinated by how much photography has (and hasn’t) changed since the 1980s. Clearly it was time to write a longer article.
What follows was originally intended for the “Notes” section of my The Boomer Legacy project, but once it grew beyond 15K–words, I realised it better belonged here.
All the equipment I write about was paid for by myself. No loaners for favourable reviews. No grants, awards, scholarships, bursaries, or handouts from distributors/ departments/ partners/ passers–by or multi–millionaire racehorse owning Fathers in Law.
90% of the following is unashamedly about photographic equipment. Gear–head stuff. Hardware. Where the metal meets the meat. No bearing witness
nor sweeping tapestry of lingering unregeneratively in Plato’s cave
. No clickbait SHOCKING SECRETS & LIES EXPOSED!
. Absolutely no Artspeak. Nor do I indulge in photographer clichés of lauding my gear while disparaging everyone else’s. Indeed some of my most used cameras I only tolerate until I can upgrade to something else. I even poke fun at some of my gear because… why not?
Consider the following a guided tour through the mostly 2nd hand equipment I have used over the last 45 years. Sometimes I explore tangents to address broader issues, or relate stories, or give obscure advice, or even dwell on the kind of technical minutiae which would make a nerd’s head spin. It’s all part of the fun and, what the hell, it’s my website and I’ll do as I please 🙂
Overview
Photography Now & Then
was originally a single article, but has since been split into three sections:
- Part 1 — Film cameras
- [ link ] Nikon & Leica 35mm cameras, Hasselblad & Mamiya 120 medium format
- Part 2 — Film, Filters & Accessories
- [ link ] B&W negative, colour transparency and negatives; Film processing; Lens filters; Hand–held lightmeters; Flash & continuous lighting
- Part 3 — Digital Cameras & Photography
- [ link ] Sony & Leica mirrorless cameras; Digital workflow, issues, impact of A.I.; The importance of your own website
Student Cameras
We all gotta start somewhere…
Nearly all the cameras in this section, which I used as a student in the 1980s, are fully mechanical and manual exposure. I learned from experience you cannot trust auto–exposure with film as you only find out too late if it didn’t work. You can of course shoot a sequence of ±EV backup exposures, but it’s an extravagant waste of film, especially for 120 medium format where costs amount to $s per frame.
Due to the “analogue resurgence” since the late 2010s, a lot of the following gear has become popular again, especially among younger photographers. Hence the detailed discussions below.
Section Quick Links
- Minolta SRT–101
- Nikon F2 Photomic
- Polaroid OneStep 600
- Nikon F
- Nikon F4S
- Rollei 35S
- Rolleiflex T (M2)
- Mamiya RB67 Pro–S
- Fujifilm GW670 III Professional
Minolta SRT–101 (1980) ↑
I purchased my first 35mm film camera in 1980 when I was sixteen: a 2nd hand Minolta SRT–101 with a Rokkor 50mm ƒ1.7 lens. Fully manual and mechanical, the “101” still gets a lot of love online — see this 2024 Reddit thread — but I never felt it. There was nothing particularly wrong with it, I just found the results uninspiring.
I mainly got it to bask in the glory of all the print ads in early 1970s National Geographic Magazines. It was an adequate albeit boxy camera, the CLC metering was reasonably accurate (for reflected readings) and the 50/1.7 lens was fine. But I always felt I could do better, so sold it within a year. Almost 20 years later I was surprised to notice a “101” pop up again as Rose Byrne’s retro camera in the Aussie crime film Two Hands
(!?)
Nikon F2 (1981–6) ↑
In 1981 I spent my final year at high school working two after–school jobs to save for my first proper camera: a 1972 silver chrome Nikon F2 Photomic. Got it 2nd hand from a retired accountant for $AUD 490 — which in today’s money works out to $2420.
It had a DP–1 Photomic viewfinder, which I often swapped with a DW-1 waist level finder for candid shots. In all aspects it was a significant improvement over the SRT-101, although six months later I carelessly dropped it onto concrete and broke the body shell around the lens mount (!) Irreparable damage, despair & grief. Took it to a few camera technicians but they all shook their heads. One of them even laughed. I used epoxy glue to mend it as best as I could, but a few years later sold it for spare parts 😢
Until then I used it without too much trouble. Only the body shell beside the lensmount had fractured, everything else — shutter, mirror mechanism, viewfinder, lens mount, camera back, film transport etc. — all worked fine. The epoxied mount was as strong as ever, although the lens axis was now ≈ 0.25° out from perpendicular. At wider apertures this resulted in the RHS frame being subtly close–focused. Worked around it by photographing things at an angle so the RHS was closer to the camera. It even proved a benefit for portraiture for it acted like a lens tilt which brought the lower part of the sitter into better focus.
25 years later I purchased a 1979 black chrome Nikon F2A with DP–11 finder. By then I was using a Leica R6.2 and deep in Leica Land, so feelings were more muted. Indeed I was unsentimental enough to have the F2A butchered modified by a NYC camera technician so it could work with Leica R lenses — see my Leica FAQ.
Nikon F2 merits? Fully mechanical & battery independent operation, aside from the 3V CR1/3N battery to power the lightmeter in the photomic finder. A large selection of interchangeable finder options and focus screens. It was MD-2 or MD-3 motordrive ready — not that I ever used one. It featured a Ti–foil shutter rated for at least 100K actuations, when this was unheard of. Most importantly it shouted Pro Cred!
, which to a 17–year–old meant a lot.
I had a Nikon AR-1 soft release and Nikon AS-1 flash coupler. I also had an accessory DL–1 Photomic Illuminator which screwed into the DP–1 eyepiece to light the finder frosted panel — very convenient for night work, in my case rock photography in murkily lit pubs. The DP–12 finder later addressed this by using a triple LED viewfinder display.
-

Rock photography with the Nikon F2 and 50mm ƒ1.4 — Nick Cave & the Birthday Party in 1982
Issues? The shutter + mirror–return were “statement” loud, which made candid photography awkward. The film advance felt rought when compared to later cameras. X–ync was only 1/80th, restricting use of flash outdoors. I also found many Nikkor lenses were to my critical eyes “meh”. Most fatally, despite changing my shooting technique to adapt to the patched camera’s non–perpendicular lens, images remained subtly out of focus on the RHS at wider apertures. Eventually it became so annoying the camera had to go 😕
Polaroid OneStep 600 (1983–7)
For a few years in the mid Eighties I had a Polaroid OneStep 600 Land Camera to compliment my film gear. I couldn’t afford the premium SX–70 (which ceased production in 1981 anyway), but the OneStep 600 was cheap and cheerful. Unfortunately it was also embarrassingly primitive:
- Low resolution with blurry frame edges
- Fixed focus 1.2m → ∞
- Sliding tab beneath the lens for crude exposure control
- 10× shots per film pack (modern packs now only do 8)
- 77×79mm (W×H) i–Type prints, effective 640 ISO
- Each print required ≈ 3 minutes to fully process, longer at colder temperatures. Development was never consistent, resulting in blotches & streaks, especially in areas with plain colour
- In low light you needed a disposable flash–bar with 10× bulbs
- Despite folding to protect the lens & viewfinder, the camera remained quite bulky and a nuisance to carry around
And so on… Yet it had one overwhelming advantage — it produced instant colour prints! Which made it indispensable for quickie shots and exactly the thing mobile phones are now so useful for.
Decades later in the mid 2020s, instant photography had a moment. At a high school charity function in Sep 2025, I noticed a lot of teenage girls (dressed in pyjamas?) were using Fujifilm Instax Mini 12 cameras, which to my experienced eyes yielded dreadful images half the size of traditional Polaroids. Yet the kids were delighted with their prints and shrugged off my critical remarks. Egy gyereknek minden új.
I found this intriguing so did some research:
- Instax cameras aren’t covered by the NSW school mobile phone ban
- It’s another part of the broader “analogue resurgence”, with a growing desire for physical artefacts which can be gifted and shared
- Polaroid’s patents expired a while ago
- Per print, Fuji Instax is cheaper than Polaroid (≈ ½ price)
- “Instax Mini 12” cameras only cost ≈ $AUD 120
- Leica make a high end (Fuji re-branded) Sofort 2 for $AUD 699
- FFS you can even get Instax adapters for Hasselblad V for $US 800 (!)
Nikon F (1986–92)
After breaking the Nikon F2 (and my teenage heart), I swore I would never spend a fortune on a camera again. (Hah!) So in 1986 got a pair of “beater” 1960s Nikon Fs for ≈ $AUD 100, with scratched bodies and dented non–metering finders. When combined with a hand–held meter, they did the job surprisingly well and were used as “B Cams” for years, even accompanying me as who cares if they get stolen
cameras to Eastern Europe in 1991.
Solid, bulletproof and dependable, but after the F2… clunky, antiquated and dull. Having to remove the entire camera back to change films was exceptionally irritating (a scheme inherited from the 1957 Nikon SP). By mid 1992 I was heavily into 120–medium format and had also acquired a shiny new Nikon F4S, so sold the Fs for roughly what I paid.
-

In Moscow with the Nikon F in 1991, at a protest near the Gorky Park entrance
Bulletproof eh? What about Mark Meyer’s Leicaflex SL2 Mot, which survived an 8 km fall from a fighter jet after a mid–air collision?…
Nikon F4S (1992–3)
In 1992 I lasted long enough as a solicitor to finance upgrading my pair of vintage Nikon Fs to a brand new top–of–the–line Nikon F4S (1791), with a MB–21 6× AA battery pack and kit AF NIKKOR 50mm F/1.8 lens. Similar to the earlier F models, it supported a variety of interchangeable finders, so I also got a DW-20 waist level finder (had to import it from Singapore — you can get 3D printed WLF alternatives now). I additionally replaced the standard Type B focusing screen with a manual–lens friendly Type P.
The F4S was a big clunky thing with a built–in motorised film advance, and the only camera I used in my twenties which was fully electronic. It had multi–mode exposure automation with PH, P, S & A exposure modes, although I mostly used M alongside a trusty hand–held lightmeter. Photographers didn’t know it at the time, but it was the last F model with s/speed & EV dials + levers + switches. The subsequent Nikon F5 ditched them in favour of a modal control–dial interface, familiar to digital shooters even today.
Reviewers at the time swooned over the “foolproof” matrix exposure metering, although it took only five minutes to realise it had the same limitations as every other reflected meter. Moreover the two LCD displays turned out to be susceptible to LCD “bleeding”, where after a few years both developed irreparable inkblot artefacts — mainly why second hand F4 cameras have become so cheap.
I never experienced LCD artefacts myself as I only kept the F4S for 18 months. It was just too hefty/ loud/ conspicuous for the street and candid work I did at the time. I also found the early single–point screw–drive AF suboptimal (ie. crap), while the near-silent “CS” film advance mode
wasn't and the maxed–out “CH” 5.7fps ridiculous film–thrashing overkill. Finally, the textureless smooth rubber coating didn’t inspire confidence it wouldn’t one day fly from my hands…
At the time I didn’t have a photo trolley, so carrying the lump around my neck was exactly the type of character building I didn’t need. Meanwhile the Canon EOS–1, with its rear-mounted magical game–changing “Quick Control Dial”, swept the photography world. Shrines were erected, Pros swooned, cries of Hallelujah!
echoed throughout the land. Thankfully I belonged to a tiny handful of photographers immune to its considerably overstated charms and ignored it.
Rollei 35S (1998–9)
The Rollei 35S was everything the F4S was not: tiny, quiet, inconspicuous, mechanical, all metal/ glass and Teutonic over–engineered.
Alas its fixed 40mm ƒ2.8 lens, despite being a Zeiss Sonnar, was mediocre and susceptible to flaring. To make matters worse, there was no rangefinder, so focus could only be achieved by eyeballing the distance and then setting the value on the lens 🤦🏻 It became so frustrating I got a Watameter accessory rangefinder. Unfortunately the 35S has its flash shoe on the camera base, so you had to use it upside down, then transfer the distance to the lens by hand. To add to its extensive list of quirks (LHS film winder, disassemble the camera to change film etc.), the 35S used a PX–625 1.35V Hg battery, which was so environmentally toxic it was soon banned.
The main point of the 35S was its compact body size — but how do you hold something that bloody small steadily? I persevered for 18 months then gave up. Ditched it for a Leica M and never looked back.
In 2024 the Rollei 35AF was released. Like its namesake it uses 35mm film, although the “Rollei” name and logo are now only a licensed brand, with the camera made by a Hong Kong based MiNT Camera. The new 35AF is closely copies the original 35S styling and layout, although in a larger body. It has AE support, a QLED display and LIDAR based AF. It looks interesting, although reports of unreliability are a worry. Likewise the heavy–press shutter would interfere with getting sharp images from an already “far too small to hold steadily” body. Opinions vary.
Rolleiflex T (1981–5) ↑
We skip back to 1981 and I’m still doing two after–school jobs to save for a Nikon F2, so didn’t have a lot of money to spare. Yet I absolutely had to get a medium format white–face Rolleiflex 3.5F Schneider Xenotar TLR. Problem was they rarely appeared on the 2nd hand market and even when they did they were prohibitively expensive.
After a few months of fruitless searching, I lowered my expectations and settled for an inexpensive Rolleiflex T (M2). Not what I wanted it, but at least it was a Rollei TLR.
Features:
- Twin lens reflex (TLR) with a pair of vertical lenses: the upper for viewing and the bottom to expose film
- Mine was a 1962 Model 2
- Carl Zeiss Oberkochen Tessar 75mm ƒ3.5 taking lens
- Bay I filters and lens accessories
- A dozen 6×6 (56×56mm) exposures per 120 rollfilm
- Grid–pattern matte–glass focus screen without focus aids
- Built–in “ν” self timer
- Built–in bubble glass Selenium lightmeter
- No auto–load film mechanism
It supported double length 220 rollfilm, but I only ever used 12–frame 120. The 75mm Tessar lens could be excellent at ƒ8–16, although you got swirly frame–edge bokeh at ƒ3.5–4. The minimum focus was 1m, which sounds reasonable but wasn’t sufficiently close for head & shoulder portraits. Rolleinar 1 or 2 close–up accessory lenses could help, but they couldn’t address TLR parallax. Even so a lot of people still use them to obtain good quality portraits, so opinions vary.
-

The Rolleiflex T 75mm Tessar could yield amazing results. In the 46MP scan of this 1983 image, you can count the fine hairs on the rioter’s wrist…
The built–in Rollei selenium lightmeter was a primitive match–the–needle thing, with its display coaxially located within the LHS focus knob. It didn’t require a battery, but worked poorly in dim light. I eventually got a vintage hand–held CdS Gossen Lunasix 3 lightmeter with “bright” and “dark” range settings, and despite its age was surprisingly accurate for both incident and reflected readings. Unfortunately it couldn’t meter flash, and similar to the Rollei 35S used a pair of toxic PX–625 Hg batteries.
What drove me to despair was discovering the upper (viewing) and lower (taking) lenses were slightly out of focus alignment. It had negligible effect at medium to long distances, but ≤ 3m it would front–focus by ≈12cm. At wide apertures like ƒ4 this could be a annoying to say the least. I would focus on a sitter’s neckline, but on film her face would be OOF while the hands in her lap were sharp. Had to work around it by focusing behind a subject’s face, which always ended up being a combination of guesswork and hope [ Note I ].
I had a tough time as a teenage photographer: Nikon F2 = angle to the right to adjust focus. Rollei T = focus behind the subject when up close. Sheesh 😡
Aside from close–focus, I was otherwise happy with the Rollei T. The shutter was quiet, the lens sharp(ish) and it was relatively compact with the WLF folded down, making it easy to transport in a small bag.
Being unable to change lenses could be frustrating, but it wasn’t too big a deal. As prime–lens users would say, zoom with your feet
.
I also wasn’t bothered about the missing geared wheels for aperture/ shutter speed adjustment, like the more expensive Rolleiflex E/ F models. Some people worry incessantly about the Rollei T’s plastic belt mechanism, yet it is robust enough to survive 60+ years. Another deal–breaker could be the cost–cutting omission of Rollei’s auto–load film mechanism. I considered it one less thing to fail and was it really that difficult to align film indexing arrows with dots printed onto the rail beside the film gate?…
Mamiya RB67 Pro–S (1985–93) ↑
Despite the Rollei T’s advantages and its role in capturing many of my early favourite images, I eventually grew tired of having to always guesstimate close focus, so sold it mid 1985 [ Note II ].
Its replacement was a 1970s Mamiya RB67 Pro–S with Mamiya-SEKOR C 127mm F/3.8 lens, purchased 2nd hand from Fletchers Fotographics in Sydney.
RB67 Main features:
- Medium format SLR with interchangeable lenses ✓
- Fully mechanical battery free operation ✓
- Ten 6×7 exposures per 120 roll, via interchangeable film backs. I only had one, but occasionally rented more when needed ✓
- The film back could be rotated between landscape or portrait without having to reorient the camera (“RB” = “Rotating Back”) ✓
- There was no built–in lightmeter with the default WLF ✗
- Built–in bellows for close–up (minimum focus ≈20cm) ✓
- NO/ NONE/ ZIP Parallax ✓
A major irritant was the multi–step process required for each exposure:
- Crank the RHS lever to arm the lens–shutter & lower the viewing mirror
- Advance the rear film magazine lever
- Release the shutter (… and behold the loud
KER–THWUNCK
sound as the mirror flopped up and the lens–shutter activated)
The later RZ67 had a combined mirror & film advance mechanism, along with an option to use a motorised winder. Which was nice, but the camera was so battery dependant I (and many others) refused to touch it.
A further nuisance was the hunched over the camera
waist–level viewfinder, since I was too cheap to buy a prism or chimney viewfinder. The RB67 was also so bulky it required a hefty tripod — I tried shooting hand–held a few times, but it wasn’t easy. Grip holders were available, but they didn’t help with the heft and bulk.
Film–fogging could also be a significant issue when working outdoors. RB67 film magazine dark–slide light traps were notoriously prone to light leaks, mainly due to foam &/or velvet seal deterioration. Discovered (much) later it was an easy fix — replace the seals — but didn’t know this at the time (no internet to search). Hacked a solution by affixing a gaffer tape flap over the slot — crude but effective.
RB67 Likes:
- All mechanical operation. During an era when batteries were notoriously unreliable (no Li–Ion back then), you never had to worry about a failed battery terminating your shoot (I’m looking at you rented Canon A1)
- 6×7 aspect ratio. Square format is excellent for various things (there’s a good reason why it was the default on Instagram), but you have to crop to fit rectangular print formats. The RB’s 6×7 is close to both 10×8 and 5×7 print sizes, so no need to excise as much
- Rotating back. You could shoot portrait format, then twist the back and shoot landscape without reorienting the camera. An alternative solution was 6×6 square format but… we’re back to cropping if you want rectangular results
- Robust & Reliable. Despite shooting more than 100 rolls I never had one seize on me. Wish I could say the same about my Hasselblads 😡
- All metal construction. Tough as, and you felt you could make Soviet Field Adjustments with only a bottle of vodka and a hammer. Completely unlike the more sophisticated and battery dependant RZ67, which used a delicate mix of plastic and metal parts to reduce the weight and unfortunately increase fragility
- Beefy “Pro” looks. A superficial thing for sure, but clients and sitters notice. A friend once complained about a dubious modelling gig she did due, in part, to the
cheap looking
gear the photographer used [ Note III ]. When she later posed for me she was very impressed when she saw the hulking RB67 on a sturdy tripod,Jesus! Now that’s what I call a bloody camera!
RB67 Dislikes:
- Don’t even consider working without a tripod + cable release. This thing is the size of a large shoebox and the weight of small car. I wrestled with it hand–held a couple of times, and decades later it still wakes me in the middle of the night. That said, the RB67 isn’t as laughably gigantic as the Fuji GX680 (thank god)
- Rapid it is not. See above for the Concorde–like preflight sequence to merely take a photo
- Film magazine light leaks. Mentioned this above and yes I know Hasselblad can also do it, but having replaced the seals in my A12 magazines, they never leak, even if you leave them in direct sunlight for an hour (did this to test). My RB67 outdoors was so bad it used to ruin frame after frame until I covered the magazine dark slide slot with gaffer tape
- Unremarkable lenses. Controversial opinion I know, but once you have used a Carl Zeiss PLANAR T* 100mm F/3.5 CFi there is no going back. Granted Mamiya K/L lenses were generally okay and could be quite sharp at ƒ11–16. They could also produce nice bokeh without distracting (Hasselblad) pentagonal highlights. They do suffer from veiling–glare though, and are noticeably less sharp at distances greater than 4m, especially the Mamiya-SEKOR C 127mm F/3.8
Fujifilm GW670 III (1993–97) ↑
I took a four–year hiatus from photography in 1993–7. Sold the Nikon F4S and RB67 and replaced them with a “Texas Leica” Fuji Fujifilm GW670III Professional for occasional personal use.
It was a large 120 rollfilm 6×7 fixed–lens rangefinder which worked fine. Yet I found it annoying as it was a fixed lens camera and the body was plastic–everything, which offended my all–metal brick sensibilities. The shutter was loud and made a ringing “twang” after exposure; The rangefinder patch was absurdly small; The EBC Fujinon 90/3.5 lens was mediocre and closest focus was limited to only 1m — ruling out portraiture and close–ups. Again. Used the camera intermittently for a few years then sold it without regret. I avoided the more popular Mamiya 6 as I had heard and read uncomplimentary things about its reliability and lens quality.
Oddly the GW670III still garners a lot of love online, making 2nd hand prices surprisingly high. Mine had < 250 exposures and the 6×7 version was rare since everyone else bought the 6×9 “GW690III”. Maybe I should have kept it 🤔
Current (120 Film) Cameras
Started using 120 film cameras in the early 1980s, and still use them more than forty years later. Their main advantage is a much larger film image which produces better tonality with minimal grain. The larger image also enlarges/ scans much better, ultimately producing better quality prints. The following section deals with the medium format cameras I currently use.
Section Quick Links
Mamiya C330 Profressional (TLR) ↑

Svelte it ain’t…
Overview
If you haven’t guessed already, I was an outrageous camera snob in the 1980s. If it wasn’t a Nikon or Rolleiflex then I didn’t want to know. Leicas were for silver spoon poseurs wealthy enthusiasts and Hasselblads were priced so far into the Oort Cloud that my meagre undergrad budget couldn’t cope [ Note IX ].
As noted above, after a few years of struggling I replaced the Rolleiflex T with a 2nd hand Mamiya RB67 Pro S in 1985.
At the time I briefly considered getting a Mamiya “Pro” C330 or C220 TLR, but wrote them off as bloated Rolleiflex wannabes. At any rate, buying another TLR was out of the question after all the focus and parallax issues I had with the Rollei T. Yashica Mat TLRs were likewise off the table as I considered them the antithesis of everything I wanted in a camera.
In retrospect I should have been less dogmatic and purchased a refurbished C330. Used prices were reasonable and 1970s models were easy to obtain, as there were a healthy stock of trade–ins in nearly every Sydney camera store. A C330 would have avoided most of my Rollei T issues and, despite the bloat, was still ⅔ the size of a hulking RB67.
Yes I know the ƒ2.8 or ƒ3.5 E/F Rolleis are famously compact, have fantastically sharp lenses and their focus action is sensually smooth. In particular the 1970s 3.5F Xenotar models have near–Hasselblad image quality, which Mamiya C lenses cannot match. They also come with enough bragging rights to satisfy even the most insufferable gear–head. (Who, me?) But, but… I had been burned by the Rollei T experience so TLRs were out.
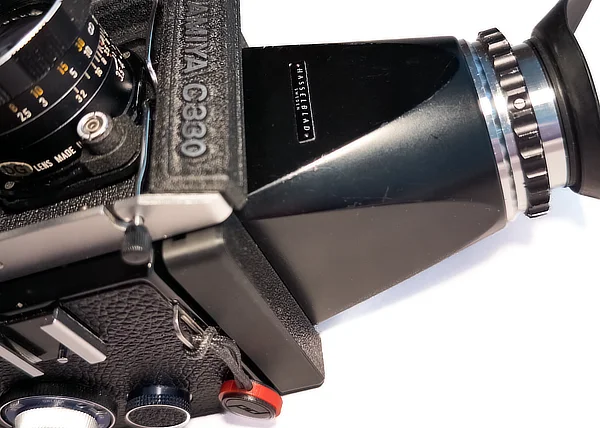
Decades later in Sept 2024 I finally overcame my TLR aversion and bought a 1971 Mamiya C330 Professional from Sydney Super 8 at King Street Newtown.
It was purely an impulse buy. Originally saw a Rolleiflex 2.8E with lens separation & fungus, then noticed an excellent condition C330 for a surprisingly low price and quickly bought it. By comparison a similar age/ condition Rolleiflex 2.8F could have cost 5× more.
Mamiya C330 overview
The final two C330 production models were the C330 Professional ƒ
followed by the C330 Professional S
. Mine is the model which preceded them, the C330 Professional
. It seems the later ƒ
and S
variants used more plastic components to lighten the load, so maybe it’s a good thing I got the first model. Admittedly the later models have a better designed RHS shutter lock and LHS friction lever for more precise focus. The S
also had a redesigned single action waist level viewfinder and (it was claimed) brighter focus screen.
The much cheaper & simpler C220 is a whopping 500g lighter, but you have to manually cock the shutter in addition to winding the film, just like the R–Bloody–67
. The C330 has internal gears for this, hence the extra weight, although you can still manually cock the lens to reduce stress/ wear on the camera winding mechanism.
C330 Features
Rolleiflexes were made as self–contained snapshot cameras with fantastic lenses, Mamiya TLRs were system cameras designed for studio portraiture and weddings. Their main selling points were their lower prices, interchangeable lenses, a selection of focus screens and built–in extension bellows which allow significantly closer focus:
- 0.35m for the 80mm F/2.8
- 0.65m for the 105mm F/3.5
(Cf. 1m for the Rollei T Tessar 75mm)
This allows you get really close with the C330, almost 1:1.5 with the 80mm. No issues anymore with head & shoulder shots — indeed you can fill the entire frame with just a hand! Things are even better with the 105mm or 135mm, where you can do tight head–shots but still remain far enough to not spook the sitter.
TLR = parallax issues. The C330 has a viewfinder LHS needle to act as a frame–top guide plus exposure adjustment — nix for the Rollei. For critical framing of static subjects, the “paramdender” tripod accessory can help.
TLR = no mirror–slap. Which guarantees quiet vibration–free operation. The Hasselblad provides a separate pre–release switch to raise the mirror.
TLR = a quiet shutter. A surprisingly crisp little click
, as opposed to the bombastic KER–THUNK
of the Hasselblad or RB67.
TLR = laterally reversed viewfinder images, just like the good ol' days where left is right and vice versa. To keep with the 1980s vibe, I do my metering with a similar vintage Gossen Luna Pro F.
120 film = 12× frames per $AUD 30 roll, so make ‘em count!
Unfortunately the C330 doesn’t feel as “solid” as my other mechanical cameras, probably due to its large interior cavity for the lens and black concertina focus bellows. People who whine about its weight really need to take the “Hasselpanzer” out for a spin…
Aside from obvious things like close–up or parallax, an inherent weakness of all TLRs is controlling lens flare. With an SLR you view through the taking lens and directly observe what things will look like on film. With a TLR you have no idea because you are looking through a separate upper viewing lens, which often sees things differently to the taking lens beneath it. Flare in the upper lens may mean none in the lower, or vice versa. It can be infuriating, especially when shooting into the light. And yes Rangefinder cameras suffer from the same problem.
Another particular C330 issue is ruining slow speed shots by inadvertently jerking the shutter release during exposure. At s/speeds less than 1/125th you need a cable release (or a pistol grip) for peace of mind. Despite having lots of longer cables for my Hasselblads, got a vintage Kaiser 25cm release off eBay.
An additional benefit of using a cable release (or grip) is to keep your fat fingers away from the spring–loaded shutter–arming lever, which is too easy to impede during use and will yield a blank frame.
Then there is the dim viewfinder/ focus screen, mainly because you look through an upper ƒ2.8 lens designed for daylight or well–lit studio work [ Note IV ].
At least you can easily disassemble C330 focus screens to clean out ever–present dust bunnies. Nix for the Rolleiflex T.
Yet aside from the bulk & keeping your fingers away from the arming lever & and murky focus screen… the C330 on a cross–body strap works well as a walk around camera. When out and about I often get stopped by younger photographers: How old is your camera?!… Why does it have two lenses?… What kind of film does it use?!…
Accessorising The C330
- Replacement focus screen “C330 Brightscreen MPD #6613 screen”. Not overwhelmingly brighter than the original, but its 45° split–image microprism is a must–have for accurate focus
- New camera body leatherette using a pre-cut kit bought off eBay. The 1970s original was curling up at the edges, so the new skin makes the camera look and feel like new
- Bakelite Mamiya M645 Series Pistol Hand Grip with built–in wrist strap. It needs to be used with a screw–in Abrahamsson (mini) “softie” to bridge the gap between pistol grip trigger and body “chin” release, but luckily there is still a bit of slack, preventing the shutter from becoming a hair–trigger. The adjustable wrist strap is also useful for a secure hold
- I originally tried a Hasselblad pistol grip (45047). Which worked, but also tended to twist on the base no matter how much the ⅜” screw was tightened. Not an issue with the Bakelite Mamiya grip, which avoids twisting due to a pair of pins which register with sockets on the camera base
- A custom 3D printed prism viewfinder adapter enables use of Hasselblad viewfinders. It was printed from a
Mamiya C-series adapter for Kiev88/Salyut prism viewfinders
STL 3D–file - For a while I used a Hasselblad NC–2 prism, but it made the camera too top–heavy. I now use a Hasselblad Magnifying Hood (42013) Type I “Chimney finder” (see image below) which, being mostly empty space, is much lighter yet still makes focusing and framing easy
The camera with pistol grip and chimney finder is admittedly bulky and conspicuous, at which point why not just use the 501CM or 500EL/M?… For starters there is no mirror slap, the shutter is significantly quieter, it has built–in extension bellows and — most importantly for this Furiously Independent Thinker — the oddball factor is off scale 🙃
Lenses
Currently use the following:
- Mamiya Sekor 80mm F/2.8 (black, silver dot)
- Mamiya Sekor DS 105mm F/3.5 (blue dot)
- Mamiya Sekor 135mm F/4.5 (blue dot)
Mamiya TLR Lenses don’t score well on the online table of MF lens resolutions. It is claimed the Sekor 80mm matches the Rolleiflex T 75mm Tessar, yet both the Hasselblad 80mm Planar or Rolleiflex 3.5 Xenotar blow them away. You can clearly see the difference under a loupe → not a disaster, but a distinct downgrade in contrast and sharpness. Most vintage MF lenses were never designed to be hyper sharp anyway, as 120 film requires significantly smaller enlargement ratios.
80mm F/2.8
My silver dot 80mm F/2.8 came with the camera. Image quality? Mush at ƒ2.8–4, but okay at ƒ5.6–11. It is also sharper at 2–4m than infinity and contrast is muted due to antiquated lens coatings.
There are (unsubstantiated) claims the later 1980s Professional S
lenses with purple anti–reflection coatings could match Rolleiflex & Hasselblad in optical performance. Opinions furiously vary. FWIW all my Mamiya TLR lenses have the original yellow tinted coatings.
Contrast can be improved slightly for B&W film by using yellow or orange filters → I always use a 46mm Hoya Y(K2) (HMC) filter, which requires only +1 stop exposure correction
135mm F/4.5
In Apr 2025 I bought an excellent condition blue dot 135mm F/4.5 medium telephoto lens. Discovered upon delivery it was a bit of a weirdo in that the taking lens aperture and leaf shutter blades were exposed at the rear. I thought I had been scammed, but upon investigation discovered it was a “feature” of the lens design (!)
A bigger quirk is focus, as it is not a true “telephoto” but rather a long–focus design. Which means at infinity the flange distance has to be 135mm from the film plane, requiring you to rack the bellows out to almost half-way. Closer focus requires even more racking, eg. 200mm from the camera front plate (sheesh). Thankfully if you remember to set the lens focal length on the LHS body dial after mounting (!), the amount of parallax and exposure compensation remains the same as for the 80mm.
The good news though is the 135mm is sharp! Magnificent for full–face shots or closeup details.
105mm F/3.5
A month later I got a blue dot DS 105mm F/3.5 lens, which has replaced the 80mm F/2.8 for everyday use since I find the slightly longer focal length (58mm equivalent on 35mm film) more convenient for everyday scenes, along with tighter crops for close–ups.
Similar to the 135mm it is a “long focus” design, so the bellows also have to be extended (slightly) to achieve infinity focus.
Discovered upon receipt it had sticky shutter blades, requiring a trip to Camera Service Centre to be CLA'd. Luckily the original eBay seller refunded the service fee from the purchase price 😀
Mamiya TLR Lenses Generally
Changing lenses on the TLR is convoluted but works:
- Cock the shutter
- Turn the LHS dial to lower the camera baffle slide (to shield the film)
- Disengage the front lens wire clamp release
- Mount the replacement lens & reengage the wire clamp
- Re–raise the camera baffle
- Set the appropriate focal length on the LHS dial to ensure the viewfinder parallax/ exposure compensation indicator is correctly configured
Sounds complicated because it is, yet with practice is relatively straightforward. Admittedly it can be too easy to fumble a step — in which case I recommend only changing lenses between rolls.
Because 2nd hand replacement lenses have become so inexpensive (≈ $AUD 300–400), if a shutter dies you can simply buy another. Alternatively the lenses are uncomplicated and simple to have serviced, provided your tech can source parts.
Mamiya TLR lenses all use 46mm filters which are much easier to source and cheaper than Rollei Bay I/ II. Searched my spares trunk and found B+W 46mm rubber hoods for the 80mm & 105mm which don’t impinge on the upper viewing lens (original Mamiya metal hoods go for $120 on eBay).
In May 2025 one of my neighbours 3D printed deep dual lens rear caps for the TLR lenses. He did a fantastic job and the new caps are better than the 1970s originals!
All lenses have leaf shutters which enable flash sync at any speed. A surprise is how stiff the shutter springs can be, which you can really feel when you manually cock the shutter. This may explain why so many used C330s have stripped/ jammed body gears from ham–fisted cranking.
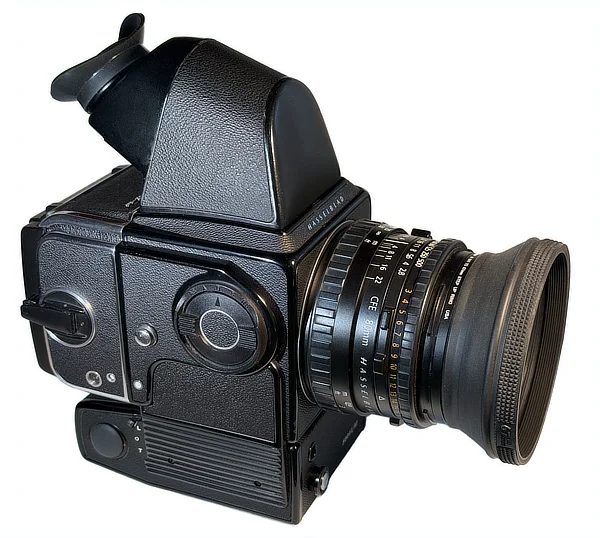
Hasselblad 501CM & 500EL/M ↑
Famous brand this, despite daft attempts by management in 2012 to trash their own legacy by releasing “Lunar” and “Stellar” re–skinned digital Sonys.
I won’t dwell on the entire 6×6 V System as there are plenty of others who have done so already — eg. Beyond The Aperture or Photoethnography. What I will do is note ‘Blad quirks and observations from my twenty years of use.
Overview
I bought my first V System Hasselblad from KEH.com in 2004: a chrome 501CM with A12 Type IV back and Planar T* CF 2.8/80 lens. At the time many pro photographers were ditching their ‘Blad gear to go digital AF, so prices for used gear dipped to “affordable” levels. I notice they have since rebounded to almost triple what I paid 😠
Although not as bloated as the RB67, I still found the 501CM + lenses bulky and a pain to carry around. Tried various camera backpacks, but by far the best solution was a homespun camera trolley where a photo backpack was mounted onto a wheeled frame. Over decades have tried various configurations before arriving at my current two, referred to as Mir
and Sputnik
:

Both enable walking around for hours without breaking your back. They can hold a camera plus mounted lens, along with secondary lenses and various film/ accessories. The smaller Sputnik
is for everyday use as it can hold a lot of gear yet still be easily wheeled around in confined spaces. The much bulkier Mir
, with its reinforced wheels, is for when I need to go in heavy and bring the proverbial kitchen sink.
503CW vs. 501CM
These were the last manual 6×6 V System cameras before Hasselblad transitioned to the autofocus 6×4.5 H System in 2013. Both 503CW & 501CM feature a “gliding mirror” mechanism to reduce vignetting for longer lenses or close focus, along with “palpas” internal anti–reflection coatings. The 503CW was the premium model with support for OTF/ TTL flash and a detachable motor winder. The 501CM was released a year later (1997) as a “more affordable” version without TTL or winder support.
As I didn’t need the additional features, I got the cheaper 501CM, followed later by a 500EL/M for motorised work. At the time on the 2nd hand market the 501CM was almost half the price of a 503CW.
In Dec 2025 I got to play with a 1970s 500C/M (10022). It felt much more solid than the 501CM, presumably due to tighter tolerances and greater use of brass internal mechanics. The focus screen was a different story though — I couldn’t believe how dim and murky it was. Give me a “budget” 501CM any day with its Acute Matte D screen and GMS mirror!
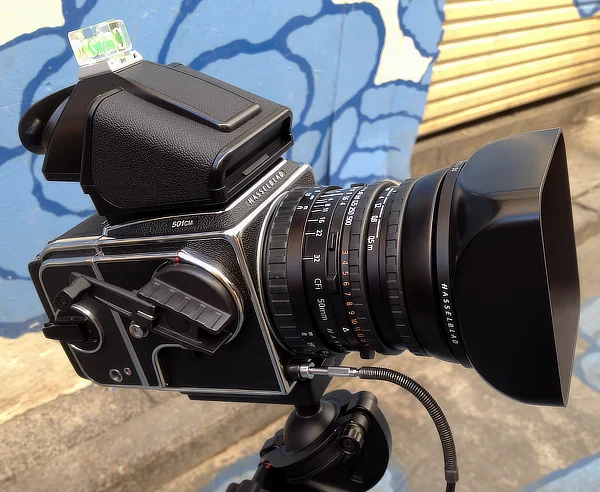
According to its serial number, my 501CM is a 2003 model, meaning it was practically new when I got it in Oct 2004. In twenty years it hasn’t let me down, aside from the occasional Hasselblad mis–cocked lens jam. For most of my early Boomer Legacy work it was used on a tripod, but from 2012 onwards I prefer using it with a modified pistol grip.
The only snafu is its internal “palpas” anti–reflection coating, which has begun to fade and crack. Cannot be helped and thankfully mine isn’t too bad. Interestingly the pre–palpas black coating inside the 500C/M still looked pristine after 50 years…
Hasselblad 500EL/M
In recent years V Series “C” cameras have become extremely popular, although the same cannot be said of their motorised “EL” cousins. The 500EL/M (10219) I got in Oct 2025 was unbelievably cheap, as it came without magazine nor finder and its focus screen was in very poor condition. Compare this to a “mint” 503CW which can easily cost 10× more.
Motorised ‘Blads remain unpopular for a couple of reasons:
- They are loud and bulky. They were designed for studio use, so the emphasis was on rapid operation and not “stealthiness”. Noise/ mass are irrelevant when the camera was intended for use on a studio camera stand
- Earlier models (500EL, 500EL/M) used a pair of archaic 6V NiCad batteries (“DEAC 5/500 DKZ”) which could only be recharged in–camera. These (temperamental, expensive, heavy, low capacity) cells were the bane of ELs, forcing Hasselblad to eventually ditch them for standard 5× AA batteries, even offering a conversion service for existing 500EL/M owners (as a penance?)
So why bother?…
Nail, say hello to Hammer
. These things are fierce. They were designed to be simple and reliable and clatter along for 100Ks frames as they barrelled through the Russian Plain. It’s no coincidence I refer to mine asThe Hasselpanzer
- Cheap. Collectors are so obsessively preoccupied with “MINT+++” 503CWs that ELs tend to be shunned
- They are always armed and ready. Take the picture,
KLACK WEEEERRRT
and the lens is automatically re–cocked with the mirror returned - It is the only camera I have ever used which requires a 1.5A slow-blow fuse. There are even three sockets for spares, so they must have been popping them all the time [ Note V ]. Fingers ✗’ed I haven’t blown one yet
I got an ‘80s vintage 500EL/M instead of a more modern (say) 555EL/D, precisely because it was the older 2× NiCad version. These are very unpopular (ie. cheap), yet can now be powered by internal battery adapters which work better than the originals. I use a pair of “Hasselconverters” with USB rechargeable 8.3V 5400mWh cells, as lighter and more sustainable alternatives to 9V Alkaline/ Lithium [ Note VI ].
I specifically chose a 1983 model as it was late in the production run (1971–84) and like my F3/T, was what I would have bought in the mid Eighties if I had the $10Ks required 😕
The 500EL/M has a DIN socket for external power to recharge NiCads or for long electronic cable releases. It is located on the RHS motor housing beneath the A12 magazine frame counter. Haven’t played with it yet and covered it with a cap made from Sugru silicone putty, which can be peeled off if required. Also used Sugru to replace the four cracked/ missing plastic feet on the camera base.
The 500EL/M lacks the “Gliding Mirror System” of later models, which in my case is not an issue as I only use 2.8/80 or 3.5/100 Planars on this body. If anything the simpler mechanics makes the camera (a tiny bit) quieter and (perhaps) more reliable.
Most of the time the EL/M is used with a “46221” pistol grip (see below), although I also have a “46063” FK–30 cable release for tripod/ monopod use. I notice you can get after–market replacement shutter buttons which are threaded for mechanical cable — haven’t bothered as I already have the FK–30.
Hasselblad Flexbody
During 2012—15 I used a Hasselblad Flexbody (3072109) whenever I needed tilt, shift and/ or close–up:
- Tilt: approx. ±28°
- Shift: approx. ±14°
- Bellows extension: 22mm
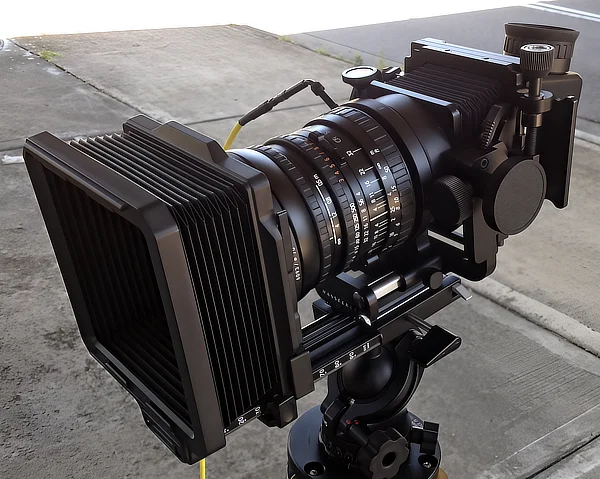
I mainly got it for architectural/ landscape work, where the Scheimpflug principle increases DOF and provides perspective control. Emphatically refused to use it for “miniature faking”.
It worked as advertised and certainly looked imposing on a tripod. Yet it was incredibly fiddly, similar to a view camera only far more constrained. For starters the lens was mounted with its centre line at 3 o’clock. You could only use standard V Series lenses, which restricted you to modest amounts of tilt/ shift — unlike the Hasselblad Arcbody with its dedicated Rodenstock lenses. To arm the lens shutter, you rotated a small dial on the camera, then closed the lens prior to exposure by a half–pressing a cable release. You then swapped the focusing–back & 90° viewer for an A12 film magazine, then advanced the film via the magazine crank (which on other ‘Blads you never touched mid roll). BTW don’t forget to remove the magazine dark–slide as there is no locking mechanism to remind you…
Which is all very pure & heroic, but in practice was a curse–inducing PITA. Shot my last roll with it in 2015 and kept it in a trunk until 2024, when I sold it without regret. Should I ever feel the urge to Scheimpflug again, I’ll get a Linhof Master Technica and be done with it. Or maybe even a digital tilt–shift lens.
Zeiss T* lenses
Come for the elegant V Series modular camera design, stay for the Zeiss T* lenses.
Mine are “CFi” versions, with reputedly the best ergonomics, lens coatings, internal anti–relfection blacking and reliable shutters. I had each CLA’d a couple of years after purchase, so they shouldn’t need servicing for another twenty years. (Some claim you need to do it every year. Yeah, right…)
Each lens has a B60/B70→67mm filter adapter ring to enable use of 67mm filters, lens caps and rubber lens hoods. Since I mostly use ‘blads for B&W work now, I have B+W 040 Orange filters to darken skies and B+W 022 yellow filters to lighten skin tones + less dramatic skies. I have multiples of each so can pre–mount them to avoid fiddling on location. FWIW I don’t use UV filters on the Zeiss.
A lot of people wax lyrical about how “perfect” Hasselblad lenses are. Not me. While admittedly they are very good, they have nowhere near the resolving power nor colour fidelity of certain Leica R or M optics (see below) or Rodenstock large format or Alpa lenses. Disagree? Mount any V Series lens onto a high MP digital camera and standby for disillusionment. Nevertheless they are significantly better than Mamiya–Sekor C lenses on the RB67 Pro S or Mamiya C330 TLR.
Like most retro medium format systems, V Series lenses have built–in leaf shutters (B—1/500th), which enable flash sync at any s/speed. This was one of their biggest selling points prior to the advent of high speed vertical–travel shutters in the 1990s [ Note VII ].
For closer focus I have 16mm (40541) and 8mm (40649) extension rings. Neither have electrical contacts, which are the “16E/ 8E” models. While not macro, both work excellently for occasional full–face portraits or close–up details. They are also vastly cheaper than the dedicated Makro–Planar 4/120 CFE lens.
I have all the relevant Hasselblad boxy lens hoods, along with a Proshade 6093T (40739) matt–box, but prefer B+W 67mm rubber lens hoods on the 3.5/100 and 2.8/80 lenses. They do an excellent job shading/ protecting the front element and fold back onto the barrel for compact storage.
Loading Film
This is much more fiddly than it needs to be. You have to learn to slow down, or else pre–load your films in spare A12s prior to use. Small wonder the Rolleiflex film “autoload” mechanisms were so beloved by harried 1960s photojournalists.
The basics of film loading are covered in detail by M.Thomas (2012) Photo: How to Load a Hasselblad Film Back
on YouTube.
A few extra tips:
- Do it in a shady place. 120 film is made up of a paired layer of film + paper backing, so it doesn’t require a lot of direct sunlight to leak around the paper edges to fog the film
- You don’t have to detach the entire film magazine from the camera body, just pop the film insert out of the magazine shell
- Make sure the Hasselblad body is always cocked. This takes getting used to when coming from other systems, but with ‘Blads you do everything with the lens armed. If you don’t then you will lose the first frame when winding on. Up–vote for the 500EL/M which does this automatically following every shot
- The YouTube video shows the importance of aligning the film–backing arrows with the triangular marker on the film holder clip. I always give it an extra ¼ turn to provide additional space between frame 1 and the film leading edge
- Film magazines (at least Type III & IV) stop at “12”, which is annoying as you cannot cheapskate an extra frame onto the end of a roll (a cool feature on the Rolleiflex TLRs)
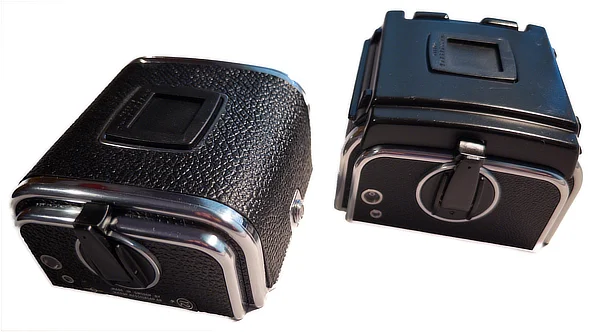
I currently have three A12 — 6×6 magazines: 2× Type IV (with rear integrated slide film holders), and a Type III (without). The two IV’s stay on the cameras while the III is used for a “B Roll” when I quickly need to change films. Both III and IV types have the most up–to–date film transports, yet their external appearance is sufficiently dissimilar to easily distinguish.
In case you missed it, A12 magazines only shoot 12× frames per roll. At $AUD 30 per roll you better make each frame count. I have never tried a A16 6×4.5 (30082) back as you also need a 90° viewfinder with a 645 focus screen cropping mask. If you decide to go down this route, be careful of inadvertently getting an A16S back, which is actually a 4×4 back for “super slides”, viewable in (some) 1970s slide projectors. “Slide Night” anyone?…
I wouldn’t bother with earlier magazine types, especially the “Magazine C12” (Type I) with its speakeasy peep–hole to align frame #1 — although it is so wildly antiquated I may get one just for LOLs!
Some people obsess over magazine shell/ insert serial numbers matching. I don’t, but wouldn’t buy a magazine if the insert was > 2 years older than the shell. Use this site to check Hasselblad S/Ns for manufacture dates.
Finally, am thinking of one day maybe getting a (3:2 crop) CFV ii 50C digital back. Surely at my age I don’t need both kidneys…
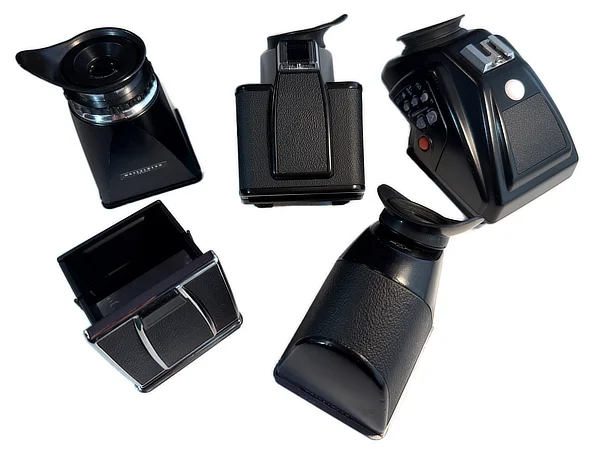
Prism Viewfinders
My 501CM came with a standard “42315” (chrome) folding waist level finder. It is light and compact, yet I found I was always popping the built–in magnifying lens for accurate focus. The L→R laterally reversed image also got old fast.
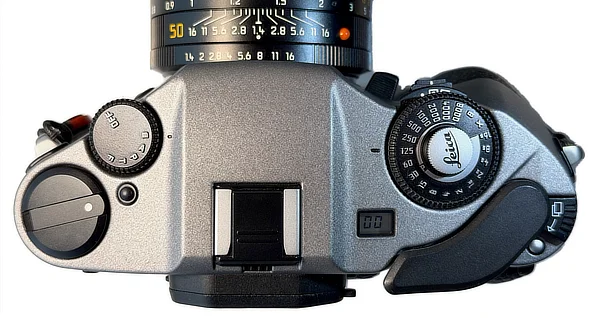
A PM–5 (42308) 45° prism solved most of my issues and I still use it today. It also has a “cold shoe” atop the prism for a spirit bubble (see 501CM photo above), or a small flash for weak fill or catchlight.
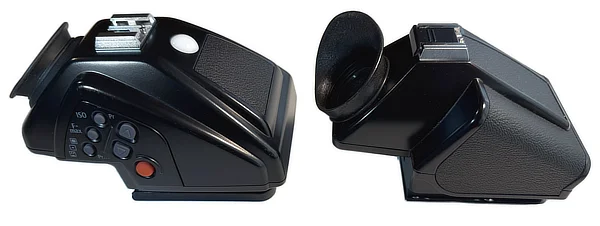
A few years later I got PME–45 (42297) metered prism since hand–held incident readings could be tricky when using telephoto lenses. The PME–45 has built–in dioptre view–lens correction along with a variety of metering options, including a small diffuser ball for incident readings (!) It uses a single CR2 V3 lithium battery which lasts forever. Nevertheless I stopped using the PM–45 after a while as I found it too ungainly — not heavy as the external housing is mostly polycarbonate. I also became paranoid as eBay prices kept climbing. Reverted to using the PM–5 and now keep the PME–45 in safe storage, should I ever need a deposit for a second car.
When I got the Mamiya C330 in 2024, I decided it needed a compact eye level finder. The original Mamiya options (Poro Finder
or Poroflex
or Eye–Level Prism Viewfinder
) were overpriced, ancient and murky. Since the costly PME–45 was out of the question, I got a Hasselblad NC–2 (52027) 45° prism, mounted via a 3D printed adapter. Worked (very) well, although it did make the C330 top heavy. When I got the finderless Hasselpanzer a year later, I moved the NC–2 over there and had to search again for a replacement C330 finder.
Ended up getting a KEH “bargain” grade Hasselblad Magnifying Hood (42013) Type I “Chimney finder”. It is light and works great, but annoyingly I'm back to viewing things L→R reversed again 😖
Pistol Grips
Initially used the 501CM on a sturdy tripod, which worked fine but was slow and a pain to lug around. Eventually got a much lighter Induro CT214 carbon fibre tripod — but handling remained slow/ bulky/ awkward.
Around the same time I bought a couple of 45° prism finders and started experimenting with using a monopod or else shooting hand–held. The monopod worked fine but was still slow and bulky(ish), whereas hand–holding only worked at s/speeds ≥ 1/125th, as things got increasingly shaky at slower speeds.
I then discovered Pistol Grips, which promised a reasonable compromise. Unfortunately there were none specifically designed for the 501CM (or 503CW), so I used a generic grip as a kind of chest pod and tripped the shutter via a short cable release.
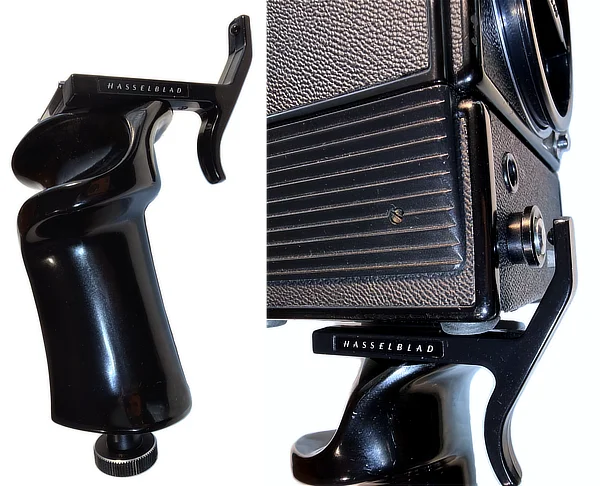
It was clumsy and inelegant but worked. Yet This Would Not Do™. So I modified the trigger on a Kiev pistol grip and now we’re talking:

My 501CM grip is a combination of a modified Pistol Hand Grip Handle for Kiev–88 Salut–S with a Hasselblad Tripod Quick Coupling Release (45004). A little later I tried to similarly modify a Hasselblad “45047” Pistol Grip, but the Kiev–88 version worked much better as the 45047 had a slack trigger spring.
Have used my “frankengrip” for almost fifteen years, and although it would make W.Heath Robinson smile, it mounts firmly and is secure. It works very well, even down to s/speeds of 1/30th, and if I pre–release the mirror I can get down to ¼ sec. Any slower and I'm back on the tripod.
For the 500EL/M, Hasselblad made a specific “46221” grip with an elongated trigger finger. It works great but unfortunately it lacks the slide–in convenience of my hacked Kiev grip, as you need to attach it by screwing into the ⅜” socket on the camera base. Consequences.
| Part # | Notes |
|---|---|
| Flashgun Brackets | |
| 45169 | For 501CM or 503cw, left hand grip |
| 45071 or 45073 | For the earlier 500 Series models, left hand grip |
| 46329 | For the motorised EL or 500EL/M, right hand grip |
| Pistol grips | |
| 45047 | For earlier 500 Series models |
| 46221 | For the motorised EL or 500EL/M |
Miscellaneous Accessories
Bay (60/70) Filter Adapter Rings
Purists will recoil in horror but I have never used Bay–60 or Bay–70 filters. As noted above I use a Tiffen Bay 60 (or Bay 70) to 67mm step–up ring. They are made of aluminium and live permanently on each lens, although can be quickly removed if required. They enable use of easy–to–get 67mm filters, rubber hoods and lens caps. Since I tend to lose caps easily, any center–pinch generic 67mm cap will do. Brand aficionados can spend up big for a Hasselblad H (3053360) 67mm at £UK 18, or a Ziess 67mm for $US 29 (+ shipping for both).
Hasselblad 45° Cable Release Adapter (50776)
These are available on eBay or online retailers. They make using a standard cable release less stressful for the shutter button as they provide free play for the cable to rotate and swing. They also angle the cable off to the side instead of going forward, which otherwise you then have to bend back (see the Flexbody and 501CM photos above).
Hasselblad “unjamming” tool
These are essential to help re–sync desynchronised lenses or bodies, where one is armed but the other not. One end of the tool is to re–arm lenses, the other for the camera body cam. They are available on eBay for ≈ $US 20.
Focus Screens
Acute Matte D (42215) is the only way to go and came with my 501CM. It has a central split–prism surrounded by a microprism collar, with a large reference–cross to help with verticals. Unfortunately used prices have reached defence procurement levels (≈ $US 800!). Some money–grubbing diсkheads people even swap them out of motorised Hasselblads to sell the “42215” screen on its own for an obscene markup. In my 500EL/M I swapped out the supplied screen with a Maxwell Precision Optics “Hi–Lux” resurfaced reference–cross screen (42165), which is bright enough and works okay. BTW “Acute Matte” screens are distinguishable by the double–dimple on the LHS bottom of the metal frame.
Prism Rubber Eye Cups
Got a nice prism but the rubber eye cup has deteriorated? Despair not, for you can replace it with a brand new Kiev clone for (Hasselblad relative) pennies — see Araxfoto.
Hasselblad Quick Coupling Adapters
These are mounts which attach to a tripod/ monopod head and allow “quick” mounting of the camera by sliding it into the adapter. There are many varieties (eg. 45004, 45128, 45130, 45144), choose whichever you prefer. Many people ignore them and instead use an Arca Plate adapter on the camera base, to then mate with a ubiquitous Arca mount on their tripod head. Boat. Float. Whatever.
Current (35mm) Cameras
Over decades have used a large number of 35mm film cameras. Gravitated away in the early 2000s due to a preference for medium format film, but a decade later I started shooting 135 film again. The following are selection of models I currently use.
Section Quick Links
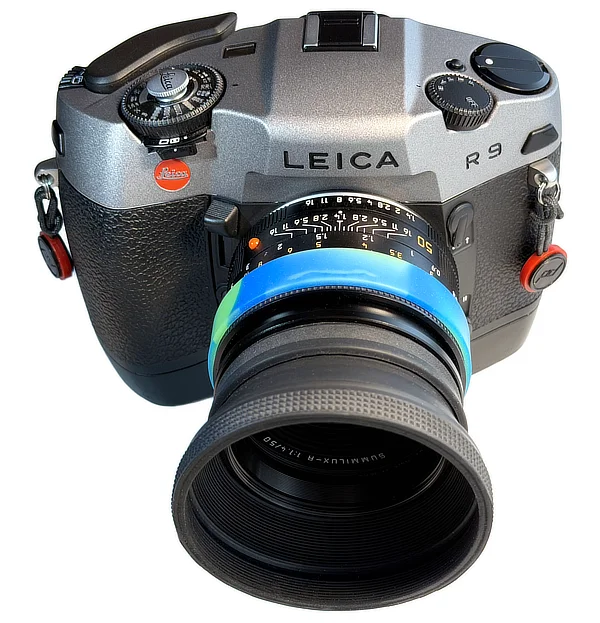
Leica R6.2 (1998–2017) ↑
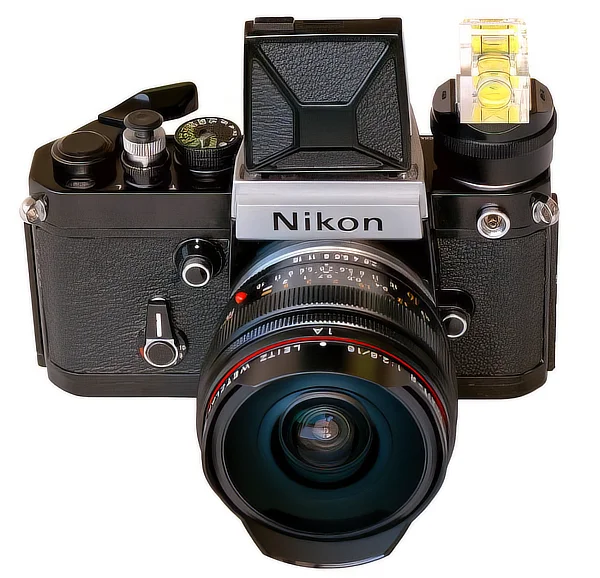
I originally bought a Leica R6.2 (10073) in 1998 to replace the workaday Nikon F90X I was using for commercial QTVR panoramas. I chose the R6.2 because it was fully manual, didn’t require batteries (except for the lightmeter) and worked with my Leica FISHEYE-ELMARIT-R 16mm f/2.8 lens (11222):
I was happy with the R6.2, but when combined with a Motor Winder R (14208) it became bulky and loud (+ heavy as the winder required 6× AA batteries). Consequently I sold it and moved on to using Leica Ms for most of my work.
During 2017 I bought a few Leica R lenses to use with my Sony Digital mirrorless bodies, then realised I also needed a Leica R body to occasionally shoot film. Initially got a Leica R7 but found it frustrating, so in May 2017 traded up for a 2002 Leica R9 Anthracite (10090) with an R8 Motor Winder (14209).
Leica R9 ↑
When the Leica R8 was released in 1996, it attracted a lot of criticism for being too heavy & bloated & trouble–plagued. Due to its unique design, which incorporated the viewfinder pentaprism into an undulating top plate, critics also disparaged it as The Buffalo Leica
or The Hunchback of Solms
.
Nevertheless the R8 was sufficiently successful to ensure an updated R8.2 R9 version in 2002. The R9 kept the same overall design but is 100g lighter, has a top–plate frame–count display and mode–wheel lock, updated electronics and is substantially more reliable than the (early) R8 — see Harris, J. (2023) Leica R8 and R9 SLR walkthrough
at YouTube.
A note about R9 accessories above:
- The Summilux 50mm (E60) lens has a B+W 55mm rubber lens hood, attached via a Sensei 60–55mm step down ring
- The lens front element is further protected by a B+W “F-Pro” E60 UV filter
- A black silicone rubber ring separates the rubber hood from the (tokenistic) built–in hood, while a paisley blue silicone wrist band covers the lens focus ring to increase “gripiness” plus aid in identification (all my R lenses have different coloured bands)
- The camera base has a R8 motor winder
- Peak Design Strap Anchors in the camera eyelets
- The shutter button has a 12mm chromed brass Leica Soft Release button (14015)
- The flash shoe has a Nikon BS–1 accessory shoe cap
The pair of CR–123 3V lithium cells in the R8 Motorwinder power the camera’s lightmeter and electronics. Without a winder, the R9 body uses two smaller CR2 3V lithium cells. I have no idea how long CR2s last, as I have always used the larger CR–123s cells in the winder. One thing is certain though, the pair of CR2s last much longer than the button cells (or single CR1/3N) in the Nikon F3 (presumably why Leica chose them). Unlike the F3 however, the R9 has no mechanical backup shutter setting. Dead batteries = dead camera.
R9 Likes
The R9 is my usual go–to for shooting 135 film (that’s 35mm film folks), especially for wide angle or telephoto work. It has a number of benefits which make life more enjoyable:
Access to “Hollywood” R lenses
At a time when “CaNikon” were betting everything on autofocus, R lenses remained defiantly manual focus. I personally didn’t care, but a vast number of others did, causing sales of Leica R cameras to collapse in the early 2000s.
In 2017 I got lucky when I bought most of my 2nd hand Leica R lenses, as prices were depressed due to perceptions of “R” being a dead system. Again I didn’t care as I intended to use them with adapters on Sony mirrorless cameras. But a few years later videographers discovered R lenses and prices skyrocketed. Why? Because they have a pre–digital spherical design, where in–focus parts of an image are sharp, yet the remainder is “rounded” and “smooth”, unlike digital–era lenses which can also be sharp but “harsh” or “clinical”. I have the final R lens versions before Leica abandoned the format — sharp & smooth rendering, metal barrel construction, damped long–throw focus, firm–click aperture rings, ROM chipped.
Vintage Leica M lenses also exhibit this “smooth rendering”, but due to their non–telecentric design they don’t play well on most digital cameras, resulting in significant vignetting and frame edge artefacts. R lenses were designed for SLRs with a mirror box so have a deeper flange focal distance (47mm vs. 27.8mm for the Leica M), greatly minimising edge artefacts.
The R lens “sharp but smooth” rendering resembles classic Hollywood Cooke and Panavision Primo–L (and other) cine lenses, which can cost ten times as much. The long–throw R manual focus mechanisms also make them easier to use in focus rigs. Which hasn’t escaped the attention of professional cinematographers, who snap them up to be modified or even rehoused for movie productions. If people with very deep pockets want something badly enough, then prices will inexorably soar.
Things are frankly getting ridiculous. In Apr 2026 at the Sydney Leica store, I was offered a used Leica Super–Elmarit–R 15mm F2.8 ASPH. ROM (11326) in pristine condition. As only 420 of them were made, they have become collector’s items. The asking price? $AUD 14K (!)
R8 Winder
The R8 winder (14209) carries over from the previous camera model and is IMO essential. Its larger CR–123 batteries last forever and having film automatically advance after each frame is a godsend. Motorised rewind is “leader out” by default (ahem, unlike the Nikon F5). I wouldn’t get the 4.5fps R8 motor drive (14313), as it is enormous and uses an oddball battery pack which can only be recharged via a custom charger. Ditto the winder add–on Leica Power Pack MW-R8 (14250). In case you missed it, without a winder you need to advance film by hand as the R9 lacks any built in motors.
Beefy
Dainty it ain’t. Being a third larger than the pro champ Nikon F3, which was still in production when the R8 was released, people know you mean business when you whip out an R9 👊 Its larger top surface also spreads everything out so its non–protruding controls are easy to access and use, even in gloves.
Film Autoloading
Nikon and Canon had it for years, but it took Leica a while to come to the party. Slap a film cassette into the chamber, pull the leader across the gate and close the back — the winder will do the rest. It makes me smile every time (and try not to think too much about loading a Hasselblad A12 magazine or — shudder — Leica IIIG…).
The film chamber also has DX contacts which, if you prefer, automatically read and set the ISO from barcoded film cassettes. I tend to load my own B&W film from bulk 30m rolls, so I bought a dozen reusable cassettes off eBay which are 100 ISO DX encoded.
Only 36 frames…
… so make ‘em count. Like any film camera really, plus a huge detox from mobile phone scatter–gun shooting.
Multi–Pattern lightmeter
In my lightmeters section you will notice I am a hand–held incident–reading bloke. Although the much hyped Nikon F4 matrix meter didn’t impress, the R9’s multi–pattern meter keeps surprising with how accurate it can be. Usually. Of course things go awry with light or dark scenes, but otherwise it is (mostly) spot on. Naturally it works with any 3–cam or ROM lens, unlike the Nikon F5 which only permits matrix metering for those lenses deemed worthy by our Nikon overlords.
Winder or manual-advance
This is pretty cool. When you need to tone down the noise, you can disengage the winder by simply pulling out the manual film advance lever and then wind on by hand for as long as you like. When done, push the lever back and the winder resumes control. With the R6.2 “Motor Winder R” you had to partially extract the battery housing to get the same functionality. Motorised rewind is also available, leader in or out, but I mostly do it by hand to conserve batteries. BTW the winder can continuously deliver (almost) 2fps when you hold down the shutter release button. It is quite loud though 😕
Exposure ± lever
When shooting in auto–exposure mode, which I admittedly seldom do, the rear ± lever is handy for quickly adjusting exposure with your left thumb, without removing your eye from the viewfinder.
Exposure Modes
“M” (fully manual), “A” (aperture priority auto), “P” (program fully auto), “T” (s/speed priority auto), “F” (for flash). Most of the time I use M for Manual
. The R9 has a mode lock button to prevent the dial from accidentally shifting, something which drives R8 users nuts.
Dedicated “F” mode
F is for Flash (metering)
. As explained in a 2002 photo.net post, the “F” Mode enables the built-in flash meter — only. You manually set the X–sync (1/250th) and your estimated lens aperture, then trigger the flash via the DOF lever (not the shutter button). The camera will measure flash exposure then indicate any change in the viewfinder. “F” works best with manual or auto thyristor controlled flashes. TTL is proprietary of course, so you need Leica OEM flashes (eg. Leica SF 24D) or (say) a Metz 44 MZ2 with SCA 3502 adapter. Although “F” works as intended, it will surprise no one when I say you are better off metering with a hand–held incident flashmeter.
Clear optical finder
Modern digital EVFs can be bright and clear, but Leica SLRs have had it since the 1970s. A range of interchangeable R9 focus screens are available, including one with a framing rectangle for the crop–sensor 10MP Digital–Modul–R digital back released in 2005. I use a standard focus screen with a central split prism surrounded by a microprism collar. Am still waiting for digital cameras to implement something similar.
The R9 viewfinder supports manual dioptre adjustment, as did the R6.2. Nikon eventually got a clue and implemented built–in dioptre correction from the F4 onwards.
-

When shooting film I usually prefer medium format. But the Leica R9 is for when I wish to travel “light”
The R9 (+ winder) is a delight to use. Yet remains obscure and unpopular due to the “hunchback” stigma along with no autofocus, a deal–breaker for many. The laughably expensive used R lenses don’t help, neither does the R System being abandoned by Leica in Mar 2009. Saying abandoned
isn’t hyperbole, as Leica petulantly sold off all their R production equipment & spares, and refuse to service R cameras and lenses anymore. Luckily there are still a few aging 3rd party technicians who can do basic adjustments and repairs. Which may explain why used R9 prices remain relatively subdued 🤔
Nikon F3/T ↑
A couple of days before this article went live, I took delivery of a rare(ish) black chrome Nikon F3/T (1694). As noted at “lens–db.com”:
It is very hard to find a mint or near mint F3 black Titanium today.
Yeah well, in Feb 2026 I found one.
A month later I purchased a MD-4 motordrive and “film leader out” MF–6B camera back. For good measure I also got a DK–17F rubberised eyepiece as the original was missing from the DE–4 HP prism [ Note XI ]. The AR–9 soft shutter release button came with the camera.

When the F3/T arrived I had it CLA’d out of caution. FOUR weeks later (grrrr…) the tech reported the shutter/ transport mechanism appeared pristine. His guess was maybe < 20 rolls had been put through. It would seem the camera has spent decades mostly sitting on a shelf or locked in someone’s safe.
Those Controversial Batteries
The Nikon F3 received a lukewarm reception when it was released in Mar 1980. Unlike the legendary F or F2, Nikon’s new NASA endorsed flagship turned out to be entirely battery dependent. There was a mechanical ≈1/60th backup s/speed and time exposure “T”, but otherwise all functions required electrical power. It might have been okay if it used a hefty 3V battery like (say) a Lithium CR123A, but at the time your only option was a pair of dinky 1.5V silver–oxide EPX76 watch button cells.
Pursed lips. Cranky letters to magazine editors. Droll remarks about the strap eyelets, film–reminder holder and tripod socket still working should the batteries die. Pros around the world clutched their beloved mechanical F2s just that little bit closer to their sinking hearts…
A common misconception was the batteries were required to drive the new stepless shutter. Not so. What they do is power the new exposure timing and camera control circuits, which require far less energy. The shutter itself, like earlier mechanical Fs, is still powered by mechanical energy stored from advancing the film, either by hand or motor. The new quartz timing circuit replaces the usual gears, springs, actuators and other mechanical devices — hence the lack of buzzing during long exposures. It also makes the shutter more reliable and precise (eg. ¼ sec is consistently 250ms). Not coincidentally it also makes it more robust for extended 4fps motordrive sequences.
If only Nikon and magazine reviewers had spelled this out. They mentioned the shutter was electromagnetically controlled
, but many misread this to mean electrically powered
. Lost in translation I guess. Nevertheless in time people realised “Batterygate” was overblown and a Lithium 3V CR1/3N could easily last a year before replacement. Which shouldn’t be surprising, given the F3’s frugal electronic design. However please note:
Regardless of whether the camera is switched off or not, the Nikon F3 always discharges a small amount of electricity because it incorporates a quartz oscillator circuit.
None of this bothered press photographers and photojournalists, whose F3’s were equipped with MD-4 motordrives. Since the drive uses 8× AA cells to externally power the camera, battery anxiety became a non–issue, especially after the release of lithium AAs in 1992. Admittedly the F3/ MD-4 combination is quite bulky, although not as bad as the F2/ MD-3 it replaced.
Both are dwarfed by the monster Leicaflex SL2 MOT (!)

Nikon addressed the battery controversy by releasing the Nikon FM3a in 2001, which had an innovative hybrid shutter capable of both battery (AE exposure) and mechanical (manual exposure) timing control. Opinion remains divided over whether the FM3a shutter is as robust as the F3’s (one would suspect not). Subsequent F4 and F5 cameras were entirely powered by AA cells.
“T” for Titanium
Nikon began experimenting with titanium alloy body plates in the late 1970s, even releasing a few rare F2 titanium models. They later supplied a metering DP–12/T titanium F2AS Photomic finder for use with these “Titan” cameras.
They had also been making titanium foil shutter curtains since 1959, so they had substantial experience in working with the tricky material. Thus it wasn’t surprising when they released a F3/T titanium version in 1982 — not a rare collector edition either, but a standard production model. The initial run had a bare metal “champagne” colour, but Pros baulked at its luxe appearance, so production shifted a couple of years later to low–sheen dimpled black painted versions, as per the photos above.
Unlike the Leica M6 (and M7 etc.) “titanium” models, the Nikon F3/T uses solid titanium alloy body panels and not merely a titanium nitride coating applied to zinc or brass body parts. Yet there is little weight difference between the standard and titanium F3 versions, implying extra Ti was used to reinforce panels. Which makes the F3/T a tough little bastard and helps explain why mine is dent free, despite being 37–years–old when I got it.
According to the production code located beneath the camera back hinge, mine was made in July 1989.
Using the F3/T also feels a little unusual in that titanium has a much lower thermal conductivity than brass or zinc. Which means it takes a bit longer for the body to warm up or cool down when you put it away. Not a huge difference, but it is noticeable.
Another titanium quirk is paint doesn’t adhere well. My F3/T has a few scuffs on its corners, usually fixable with a black paint–pen on other cameras. Not with the F3/T, where the retouched paint rubs off easily. More experimentation is required…
Party like it’s 1985
I won’t churn through every F3 spec and feature as there are plenty of others who have done so already. It eventually became Nikon’s most successful professional system camera, with a production run from 1980–2001 and claims of 3M made.
Similar to my “Hasselpanzer” in 2025, I got the F3/T because it would have been the 35mm camera I bought in the mid Eighties, had I the (considerable) funds [ Note X ] and not been so hostile to its dependence upon a pair of tiny button cells 😕
Using it today is a wild Eighties throwback. Classic build quality with angular design; Manual focus; Smooth film advance and tactile levers; Loud ‘n’ chonky 4fps MD-4 motordrive; Aperture priority (only) exposure automation; Swappable focusing screens; Interchangeable 100% coverage (dust–prone) viewfinders; No built–in dioptre correction; No body battery–test indicator; Periscopic ADR aperture display; Tiny LCD shutter display with finicky backlight lamp illumination; Minuscule ASA film speed numbers; Fingernail operated switches; Both hands to change the exposure compensation dial; 150K actuation horizontal–travel Ti foil shutter; 1/80th flash X–sync; TTL with Nikon SB flashes (only); Accessory AS–4 flash coupler for everything else. Rugged solid metal Rambo II construction. Asymmetrical haircuts, padded shoulders, oversized spectacles, Sizzler and wine coolers. Klack Klack Klack to the tune of Don’t you (forget about me)
while “Ronnie Raygun” and Pershing IIs loom ominously over the horizon…
Nikon AiS lenses
Over decades I have used a variety of 1980s & 1990s Nikkor F lenses. Too many to list, but have found the best to be:
- 28mm ƒ2.8 Ai–S
- 50mm ƒ1.4 Ai–S
- Micro–Nikkor 60mm ƒ2.8 AF–D (no field curvature!)
- 105mm ƒ2.5 Ai–S (NGM Afghan girl cover)
Eighties era zoom lenses were mostly substandard, requiring Pros to stagger around with multiple camera bodies, each mounted with different primes.
My F3/T came with a “pancake” Nikkor 50mm F/1.8 Ai–S, which presumably was part of the original 1989 kit. I don’t use it, preferring instead a more modern Voigtländer Ultron 40mm F2 SLII, which I previously used on my digital Sonys from 2014–19.
My 40mm Ultron SLII is the 2012 version and not the optically identical but larger/ heavier 2017 faux Nikkor 40mm Ultron SLII–S. Both have an AiS aperture ridge, so work equally well on post 1977 Nikon bodies.
I also have a spare 3–cam Leica SUMMICRON-R 50mm f/2 II (11345), which I may adapt one day using a Leitax Leica→Nikon lens mount conversion kit. We’ll see.
Unsurprisingly all my Nikkor lenses play well on the F3/T, although the image in the 0.75× HP viewfinder is a bit small for rapid single–turn focus — a DK–17M magnifier eyepeice would address that, but for $AUD 300+ no thankyou. Swapping the standard “type K” focusing screen with a red dot brite–screen “type P” helps.
As noted earlier, even the best Nikkor Ai–S glass, while very good, cannot match early 2000s Leica R ROM lenses for their resolution and “sharp/ smooth” rendering. Have found the Voigtländer 40mm SL II, with its bokeh friendly 9–blade circular aperture, a good compromise, albeit with a slightly wider FOV compared to “nifty fifties”. Close focus at 38cm is also useful (versus 60cm for the 50mm pancake) plus it has an auxiliary close–up lens which screws into the lenshood to provide 1:4 magnification. When I need to go 1:1, the flat–field Micro–Nikkor 60mm AF–D is an obvious choice.
Nikon F5 ↑
Was having so much fun using the F3/T+MD-4 combo that in June 2026 I got another 1990s retro motorised monster — a Nikon F5.
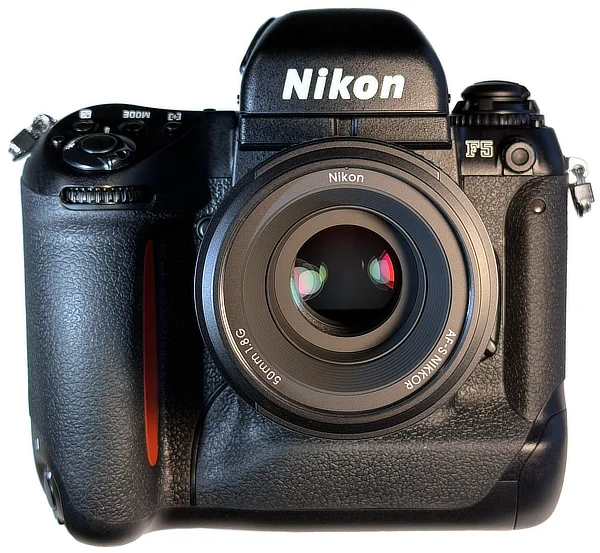
Am amazed by how inexpensive they have become — mine cost less than half what I paid for the Nikon F3/T+MD-4 four months earlier (!) According to its “3107nnn” serial number my F5 dates from 1998 and is still in (almost) box–fresh condition. Unfortunately its pentaprism release button is stiff from under use, requiring a bamboo skewer to depress it enough to release the prism catch. Otherwise the 28–year old camera looks and performs like new (!)
Reviews/ Features
Again I won’t bother outlining history/ features as there are plenty of others who have done so already:
- Nikon F5 Technical Guide (1996) PDF download (28MB)
- Dirk Halstead (Time Magazine photographer) 1996 F5 review
- Thom Hogan (2012) Professional shooter review
- Stahlbrandt (2021) Prosumer review
- Wesley King (2023) Beyond the Aperture Review
AF Lenses
I only have two Nikkor AF lenses: the previously mentioned AF MICRO–NIKKOR 60mm f/2.8D for portraits and 1:1, plus a new AF–S NIKKOR 50mm f/1.8G for general purpose.
The Macro uses the mechanical 1990s screw–drive AF mechanism, which the F5 can crank really fast due to its high torque motors. The modern 50G has an integrated Silent Wave Motor, making operation nearly instantaneous and silent (hence the “S” in “AF–S”). The Macro has a physical aperture ring while the 50G doesn’t, requiring use of the F5 front control dial plus ruling it out on older Nikon bodies.
Annoyingly the lenses have different filter diameters, so have used step–down rings to standardise on ø 55mm: 62→55mm for the Macro and 58→55mm for the 50G. Using 58mm for both would have made better sense, but I already have an assortment of 55mm filters + lens caps for my other lenses.
The F5 has five selectable focus–points clustered around the frame centre, a significant upgrade from the Nikon F4 single AF point. You use the rear thumb–trackpad to switch between points, and can lock them using the “L” button beneath the camera’s rear utility flap. There is ≈ 1 second delay between changing a focus point and its box being highlighted, which takes getting used to. The AF box colours alternate between light and dark grey, making them unobtrusive but also sometimes hard to see. I haven’t explored “Dynamic AF” yet, which seems to be a primitive version of the “Wide AF” setting on modern cameras.
F5 Random Notes
- Custom Settings
- There are 24 custom camera settings, only identified by #01—#24 on the rear LCD. You have to memorise what each does or carry around a
Custom Setting pocket guide
. For my camera I have set #10 (“CL” film advance) to 4fps and #12 (motor auto stop) at frame 35. - Motorised Film Rewind
- Works well and fast, although by default the film is completely rewound into the cassette. If you want “leader out” then you have to send your camera to an authorised Nikon Service Centre. I did this as soon as I got the F5 and it required Another Four Weeks before I got it back. You would think one of the cryptic Custom Settings would address this, but “00”. In the early 2000s Nikon grudgingly provided a custom rewind function for the Nikon F6.
- Serviceability?
- When I (eventually) got my F5 back from Melbourne, there was an all–caps warning added to the service report:
NOTE: WE CAN NOT GUARANTEE REPAIRS ON FILM UNITS AS WE CAN NO LONGER REPLACE PARTS
. Let that be a lesson for you — haven’t you heard film is dead? Presumably 3rd party repairers can do simple things, but similar to what Leica did for their R SLRs in 2009, NIKON HAVE SO MOVED ON FROM THEIR PRO FILM CAMERAS. - Shutter
- Conservatively rated for 150K actuations. Each shot has a short duration staccato “klack”. The vertical travel shutter allows flash X–sync at 1/250th, although you can set it to 1/300th via Custom Setting “#20” — for manual or shutter priority modes only. A very big deal was/ is made about the self–diagnosing and adjusting shutter mechanism but… shrug.
- Interchangeable Focusing Screens
- A large variety of F5 focusing screens were made. Previous F3 or F4 screens won’t work because they lack electrical contacts for focus point highlighting. For my needs the standard EC-B screen works fine, although I will eventually get a Type L for manual focus lenses, which is similar to the previous “Type P” with a 45° split prism plus large cross–hair to help with levelling. Current prices are absurdly exorbitant. Ditto for DW–30 waist level finders (!)
- Long life LCDs
- Unlike Nikon F4 LCD bleed, all the LCDs on the F5 remain pristine after 30 years.
- Boosting the Viewfinder
- The standard DP-30 prism is a high–eyepoint type with 0.75× magnification. I find this a bit poky, so have added a Nikon “2951” +1 dioptre eyepiece correction lens and adjusted the prism dioptre knob to provide a slightly larger image at ≈ 0.85×. A DK–17M magnifying eyepiece would have worked better, but not for hundreds of dollars more.
- “3D Color Matrix Metering” — occasionally
- It was designed to deliver accurate exposure with limited dynamic range E6 colour transparency film, so with more forgiving B&W negatives is surprisingly accurate. Alas the salarymen who disabled “leader out” film rewind also deactivated Matrix Metering for all manual F–mount lenses. You can use them with matrix metering on the F4, but on the F5 it’s strictly 禁断.
- Electronic Rangefinder
- Despite the intentional impairment of some F5 features, focus–confirmation for manual Ai–S lenses works well and triggers the green in–focus LED when focus is detected in a highlighted focus–point 🙌. Have also found the focusing screen to be so bright and clear that you can often focus manually by just using the screen surface.
- Cable Release
- Mechanical releases no longer work and you need to get an electronic MC-20 or MC-30 cable. Thankfully these are inexpensive and easily available.
- Hot–shoe missing screw?
- The flash shoe base has a hole, which I thought was from a missing screw. Upon investigation discovered the following:
[There is] an extra hole in the hot shoe to accommodate the security pin of the SB-25, SB-26, SB-27, and SB-28 flash units
. Thankfully the Nikon BS–1 accessory shoe cap still fits fine. - The last “Pro” Nikon film camera?
- A touchy subject for F6 owners, but the Digital Writing was already on the wall when the F5 was released in 1996. The wildly overpriced 6.2MP crop–sensor Kodak DCS 460 had been released a year earlier, while the more affordable 2.7MP crop–sensor Nikon D1 was released in June 1999 in the middle of the F5 production run. The Nikon F6 came out in 2004 as a “farewell to film” successor when F5 production ceased. By then most pros had transitioned to DSLRs. FWIW the F5 was the last film camera used by NASA, before they started using a modified F5 with digital innards as the Kodak DCS 760.
- “Just get a Nikon F6 !”
- At the time of writing a used F6 costs triple that of an equivalent condition F5. Furthermore, if I wanted to monkey around with firmware updates and menus on LCD screens, then I’ll grab a real digital camera. The dead–man–walking internal clock battery is also a serious gotcha.
- “Just get a Nikon F100 !”
- These “only” cost double, but lack the F5’s premium materials, professional build quality and Hollywood lore. The fragile back door latch doesn’t inspire confidence, nor does the deteriorating sticky rubber body grip.
- There are two shutter speed dials, which swap over at 1/30th second. The slow dial (B—1/30th) is on the front plate and the standard dial (1/30—1/1000th), which also spins when you trip the shutter, is on top
- The top 1/1000th speed is
serving suggestion
only. You’d be lucky to get 1/800th, and that’s with a fair wind and all your pockets stuffed with four–leaf clovers - You have to advance the film before setting the shutter speed, and notice how the top s/speed dial slowly rotates as you turn the film wind knob
- You need manually reset the film counter dial after (eventually) loading a new roll of film
- The horizontal–travel shutter curtains are made from rubberised silk cloth, which makes them very quiet. Nikon started using dimpled titanium curtains in 1959 because LTM users complained their cloth shutters would burn through if you left your camera face up in the sun…
- There are two viewing windows: use the LHS rangefinder for focus and the RHS viewfinder for framing. At least they are located beside each other on the IIIG. On earlier “Barnack” models they are well separated, forcing you to shuttle between the two
- Lenses screw on and off, which is secure albeit slow, with some lenses ending up misaligned with the centre–line not quite at 12 o’clock
- After five decades the rubber vulcanite body material is so old it tends to be crumbly and flake off. Luckily there is an easy fix: scrape the damn stuff off and re–cover using new self–adhesive pre–cut vinyl leatherette (did this for mine)
- Film loading requires patience, meticulous dexterity, a couple of pills and a large cup of tea — see Camera West TV (2020)
How To Load Film In A Leica Screw Mount Film Camera
on YouTube -

An allegorical image about technology during 9/11, taken with a Leica IIIG made before the first human spaceflight…
- Custom Leatherette
- I replaced the standard vinyl cover with a pre–cut self adhesive skin which better resembles traditional Leica vulcanite. When I peeled off the original, I discovered
1999
written in pencil on the front camera shell, between the battery compartment and “R” rewind switch. Left it untouched for future camera archaeologists to marvel at… - Soft release shutter button
- A 12mm chromed brass Leica Soft Release button (14015) to make slow speed shooting less shaky. I have a collection of similar “softies” made from anodised aerospace alloy — see “Accessories” below.
- Hot shoe cover
- Is the same Nikon BS–1 accessory shoe cap used on the R9 (and Hasselblad PM-5 and Nikon F5 etc.), although I cut a small notch to allow it to mate with the hot shoe front pin. You can get fancier ones from PPP for £UK 10 each (+ postage), presumably the elevated price being due to the pin–notch being cut for you. Ditto Japan Camera Hunter for a more luxurious $US 40. There are also plenty of 3rd party alternatives on Etsy, although few (none?) have the notch. Ardent futurists can always 3D print their own nylon version.
- Black Leica badge
- I replaced the ubiquitous “red dot” with something more Bruce Wayne — see my Leica FAQ.
- Elmar–M 50mm II lens
- I have an assortment of M lenses, but mostly prefer the chrome 50mm Elmar–M (11823) as it has excellent optical qualities, collapses down for transport/ storage and matches the retro look of the M6 TTL. (You can see it collapsed in the “TAR” photo below.) If I didn’t have the Elmar–M, the Voigtländer 50mm f3.5 APO–LANTHAR Type I would work equally well, albeit a ½ stop slower at ƒ3.5. Being an APO design however, it would probably yield (marginally) better results.
- Chrome M4–P base plate)
- It isn’t obvious, but I replaced the M6 TTL baseplate with an older one from a rare chrome M4–P. Did so to enable use of reloadable 1950s “IXMOO” brass film cassettes, since the M4–P baseplate has an internal clutch mechanism linked the external lock key, to Auf/ Zu the film cassette — see my Leica FAQ.
-

In the early 2000s one of the best ways to shoot candids was with rangefinder camera, here my Leica M6 TTL
Years after I replaced the Rolleiflex T I asked a camera technician about the short–focus issue. He said it was a common problem with TLRs where the lens(es) had been disassembled, typically to clean out dust/ mould etc., and then reassembled without checking. He said you need to use an optical bench to fully recalibrate both upper and taking lenses, which is both fiddly and time consuming. Many don’t bother and presumably this is what happened with my camera → [return]
In mid 1985 I sold the Rolleiflex T to a commercial photographer at Surry Hills. I delivered it in person, and after the camera/ cash exchange he showed me around his studio. He was in the middle of setting up a Moët & Chandon product shoot with his Rodenstock equipped 4×5 Sinar P . “Fish fryer” strobes hung angled overhead and tiny glycerine drops were applied to the bottles to simulate condensation. I mentioned the Rollei focus issue and he said not to worry as he was going to have the camera serviced anyway. He told me he was surprised/ impressed a 21yr old knew so much about vintage Rollei TLRs. Then, after considering it for a moment, he offered me a position to become his photo assistant (!) He warned I would need to start at the bottom and spend a lot of time loading/ processing film and fetching coffee/ sandwiches/ cigarettes/ answering the phone etc., but things would improve if I demonstrated talent and had a good work ethic (he had just sacked a flaky assistant). His offer was tempting, but I declined as I was still six months shy of completing my first university degree → [return]
Late one afternoon in 1983 I was joking around with a group of nineteen–year–old friends while we sat on the UNSW Chemistry lawn. Out of the blue one of them asked for my opinion about a photoshoot she had just done. Her boyfriend’s mate had invited her to pose for an Alfa Romeo ad campaign, and since she had already been considering part–time modelling, she jumped at the chance.
It turned out to be a weirdly low–budget affair. It was done at a rented inner city studio with fancy lights, but she said the photographer used what looked like a tiny cheap camera. There was only one assistant (more like a “gofer”) and my friend had to supply her own makeup. She was given a v–neck red gingham tie crop–topto wear without a bra (she said it looked like a tiny red & white tablecloth) and it was so small it barely fit her considerable bust. The brief required a still–life of a bowl of spaghetti topped with the new 1982 Alfa Romeo gold emblem, with my friend posed as a buxom torso behind, leaning forward and twirling pasta onto her fork. While taking the shots the photographer kept insisting she lean closer to show more and more cleavage, until she realised where things were headed, said
Enough!
and left.She discovered a few days later it wasn’t even a proper commercial shoot, but rather an on–spec thing to show agencies for a commission. She’d been promised a modelling fee and credit, but got neither. She was livid and felt deceived and exploited. She even suspected it was merely a ploy to
take pictures of my bloody boobs!
I agreed it likely was → [return]I compared the Mamiya C330 viewfinder to my Hasselblad 501CM + PM5 prism + Acute Matte D focus screen. No contest → the C330’s murky screen was atrociously substandard. The difference was so stark I immediately bought a replacement C330 screen from Brightscreen → [return]
The 1.6A fuse is required for when the camera is powered via the DIN socket, either to recharge NiCads or remotely power the camera → [return]
In theory the Hasselblad 500EL/M should work with only one rechargeable 9V cell, as its effective 8.3V is well above the original 6V spec. Indeed if using standard 9V Alkaline or Lithium batteries then one is enough. Yet have found you need two 8.3V rechargeable cells for sufficient power. There is no risk of frying the electronics as the pair of original 6V NiCads ran in parallel, meaning the rechargeable pair deliver 8.3V total, only 11% above the 7.5V in later 5× AA models. There is negligible weight penalty as the rechargeable cells are surprisingly light → [return]
By way of comparison, the Nikon F2 & F3 X–sync at 1/80th, a slight improvement over the 1/60th for the Nikon F. My “modern” M6 TTL syncs at 1/50th although the Nikon F4, F5 and Leica R9 are all at 1/250th. The 50MP Sony α1ii can sync at 1/400th, yet Hasselblad, Mamiya and other leaf lens cameras achieved 1/500th in the 1960s. They are all blown away by the 2024 global–shutter 24MP Sony α9III, which can sync at 1/80 000th → [return]
By Feb 2026 eBay prices for 2nd hand Rapidwinders were ≈ $AUD 1.5K, whereas new Leicavit Ms were $AUD 1.9K → [return]
Imported new cars, watches and cameras were subject to Luxury Taxes of 25% in the early 1980s. Professional photographers could claim a tax exemption, while everyone else had to pay full freight. What made it worse was when Pros upgraded, they would sell their gear at prices pegged to the higher tax–included price, rather than the much lower ex tax cost they paid. This led to weird anomalies like a well–used Nikon F3 or Hasselblad 500C/M or Leica M6 costing slightly more in Australia than brand new ones privately imported from Japan or the USA, even allowing for currency conversion and courier fees. Many non–professional photographers got used to the 4AM shuffle to call B&H Photo Video in NYC to purchase their gear. Many of us even used the dedicated international FAX line (“0017”) to make sure we got a clearer connection → [return]
According to the
Australian Photography: Photo–Directory 1992 Edition
(Yaffa Publishing Group), the 1992 price for the Nikon F3–HP was $AUD 1760 ex tax, or $2200 retail. In 2026 that works out to $5240. The F3/T isn’t listed, but we can assume it was similar to the ex tax price of the F3–P at $AUD 2075, which (inc. tax retail) works out to $6180 in 2026. By comparison the Leica M6 was $AUD 3750 ex tax, which converts to $8933 retail in 2026, while the Leica R6 SLR was $AUD 4040 ex tax ⇒ $9624 retail in 2026. Hasselblad prices were so high they were only listed as “$POA”… → [return]There are numerous Nikon DK–17 versions… DK–17 has a plain glass insert. DK–17A replaces the glass with anti–fogging plastic. DK–17F uses a fluorite coated element making it easier to keep clean — it is distinguishable by a green tinted reflection. The larger DK–17M uses a lens to boost the viewfinder magnification by 20%. All have padded silicone rings to protect your eyeglasses and a 22mm diameter thread suitable for F3 HP, F4, F5 & F6 finders → [return]
F5 Image Metadata
The F5 has a rear 10–pin PC port. Originally you could buy Nikon Photo Secretary
software to use with a MC–33 (WINTEL) or MC–34 (MAC) cable to download exposure metadata plus remotely configure Custom Settings.
In 2015 a 3rd party product called Meta35 enabled USB access with modern computers and operating systems. It sounded great and received positive reviews, but appears to be no longer available 😕
Nikon also made a MV-1 data reader which plugs into the camera PC port and downloads data to a Compact Flash card. Good stuff, although you have to do it regularly since the camera only stores data for ≈ 2100 shots. Like a lot of other vintage Nikon accessories, used MV–1 units are exorbitantly overpriced, so I won’t be getting one soon.
Using the F5
Handling — love it. Similar to the F3/T + MD-4 combo, but more compact and streamlined without the knobs or fingernail operated switches or bits & pieces hanging off. Use the front control dial to set aperture, rear dial for s/speed. Built-in vertical shutter release button. 3D Matrix Metering which actually works. Always–on viewfinder illumination. Much faster screw–drive AF due to the powerful motors. The textured rubber body grip, after being wiped down with Mothers VLR, still looks and feels like new. Have also used a touch of lighter fluid to loosen the front and rear control wheels. For a more secure hold, I use an old DSLR–size Peak Design Clutch. Presumably a RRS Nikon D6 Base Plate would also fit, which would allow use of QD mount wrist and cross–body straps.
The F5’s handling is so good its design and control features were later adapted for the Nikon D1 — D6 series of professional DSLRs and even the 2021 mirrorless Nikon Z9. People who dwell on the F5’s size and weight really need to get a clue about pre 2000s professional equipment. My “Sputnik” camera trolley exists for a reason.
Styling — timeless. All my vintage cameras reflect the times they were designed and made. Not the F5. Mine dates from 1998 yet looks like a current production model. Imported from the Future
… indeed.
Film loading & rewind — is fast. It had to be since Pros typically shot 20+ rolls a week. The only snafu is a small tab on the RHS edge of the film chamber, which requires insertion of the film cassette a certain way to make it to sit home (film leader left, insert cassette top first, rotate so film leader points right). I realise the tab is there to prevent exposed cassettes from flying out of the chamber when the back is opened, but it’s a nuisance until you master the F5 cassette twisteroo.
When rewinding without the “leader out” factory setting, it’s hard to tell when the film has left the take–up spool since there is no slot for it to pop out of. You need to be extra attentive to a subtle change in sound and film tension. Much better to have the “leader out” mod and be done with it, or invest in a “film picker” retrieval tool to pull the leader back out of the cassette.
Power — plenty. It uses 8× AA cells in a single caddy like the MD-4 motordrive for the F3, whereas the F4S (depending on battery pack) only used 4 or 6. With eight AA Lithiums you have all the grunt you could want and I wish modern digital cameras did something similar. Some people complain the AAs can drain too quickly, but opinions vary.
Motors — ripped. It has four high–torque coreless DC motors, making operation a breeze. Have found the “CL” option at ≈ 3fps the most useful as it lets you do quick double–takes. Motorised rewind screams through a roll in ≈ 4 seconds. Everyone swoons over the maximum “CH” 8fps speed, but it is difficult to control and a waste of film. (Admittedly you can adjust the fps values via Custom Settings #9 & #10.) Similar to the F4S, I don’t find the 1fps “CS continuous silent” useful as it produces a drawn–out trundling sound while the film is slowly advanced to the next frame.
Quiet — unexpectedly. The single exposure krewrk
is faster and less bombastic than the klack–zeeow
from the F3+MD-4. Of course for “CH” it’s Girls On Film
loud, but for single exposures you get more of a snap than a gunshot. The body’s metal shell, rubber grip and dampened SLR mirror all do a reasonable job subduing the noise.
Conspicuous – very. As a young bloke I hated motorised Nikon F cameras as they were all huge and loud and proclaimed Here Comes Da Photographer!
Which is why I offloaded my Nikon F4S in 1993. Yet… in 2026 conspicuous can be a good thing. No one can (sanely) accuse you of sneaking about flinching people’s souls when your camera is the size of a CCCP tractor.
Leica IIIG ↑
Forget the stupid DMC DeLorean, the Leica IIIG is Time Travel With A Vengeance. Mine was made in 1958, six years before I was born.
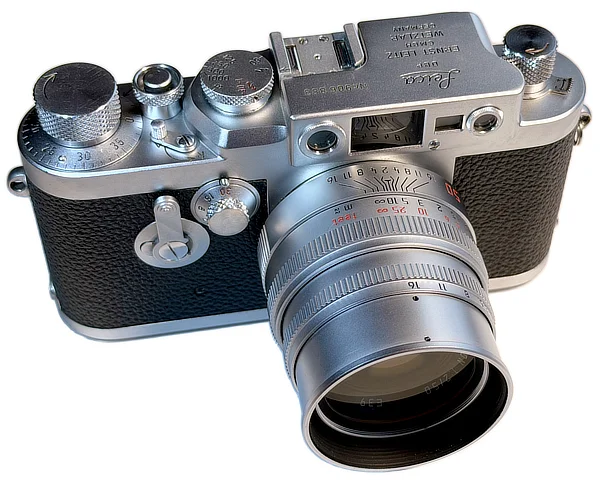
Using any Leica Thread Mount (LTM) camera is Quirks Mode all the way…
Honey, where are you going?
I’m going to load some film into my IIIG.
Will you be back before dinner?
Hopefully. Maybe.

There is no hinged camera back, so after removing the baseplate you push your film into a separate uptake spindle then poke it through a narrow slit on the base. Many keep the shutter open at “B” so they can see what they are doing from the front, after unscrewing the lens of course. The film leader tongue also has to be longer than usual to avoid getting caught in the shutter. This “tongue” is easy to trim with an “ABLON” template, although many do it by hand. I also have a collection of “IXMOO” brass film cassettes (+ Bakelite film cannisters) which I custom–load using a Watson Model 100 bulk film loader, for that True Leica Experience™.
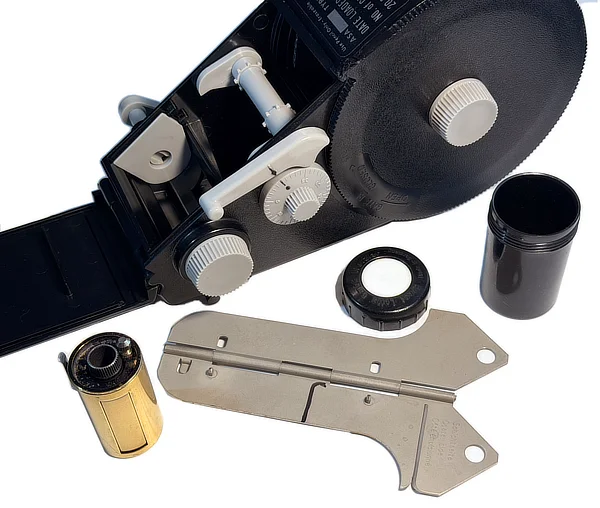
Got my IIIG in May 2015. A month later bought a 50mm Summicron M39 screw mount (11619) Japanese collector’s lens, to mix ‘n’ match old with new. Have been using the combo occasionally since, although it spends most of its time in a display cabinet now. It is incredibly fiddly to load and use, and having to swap between “standard” and “slow” s/speed dials is an anachronistic PITA. In mine the second shutter curtain has also become sluggish, occasionally leaving a narrow overexposed strip on a frame’s edge. Over years I have sent the camera to various international repairers (my IIIG has circled the globe multiple times), but no one can do anything as spare LTM parts have allegedly vanished.
Nevertheless the IIIG is a beautiful thing, a real icon of 1950s industrial design. But… I have better and more practical cameras, so on display it (mostly) stays. Luckily the rare LTM 50mm ‘cron can be reused on M–mount cameras via a 6-bit encoded Fotodiox LTM–M lens adapter ring.
Leica M6 TTL (0.85) ↑
Introduction
For years I avoided Leica M rangefinder cameras as I considered them overpriced toys for effete dilettantes wealthy enthusiasts. Yet I was so impressed by my Leica R6.2 that I began to wonder if there was something to the M hype. So in Feb 2000 I bought a cheap 2nd hand Leica M4–2 (10106) from ECS in Paddington. As I didn’t have any M lenses, they rummaged through a spare parts drawer and threw in a beater Summicron–M 50mm (11819) for $100 (which I still use in modified form as a loupe to examine films).
After a few rolls I was hooked. Sold the M4–2 to defray the cost of a new M6 TTL, then started acquiring better condition M lenses. A couple of years later I also got a M4–P and then a 1964 M3— both of which were sold when I went down the Hasselblad route and needed to (temporarily) reduce the GAS.
M6 TTL — one of a kind
The Leica M4-P worked fine, but found it workaday and uninspiring. It also lacked a built–in lightmeter. My late production M3 was legendary and very inspiring, especially since it had also been overhauled by Leica in Solms. Unfortunately the 1950s film loading scheme was finicky (and no, the “M2/ M3 Quickload Kit (14260)” didn’t help) and the 50/ 90mm viewfinder frustrating → see my Leica FAQ M3 entry.
Enter the chrome Leica M6 TTL 0.85 (10466), which I got new in July 2000.
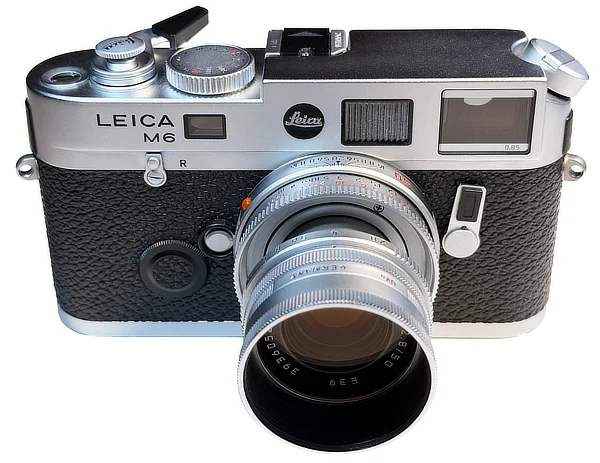
A few notes about the M6 TTL in the photo:
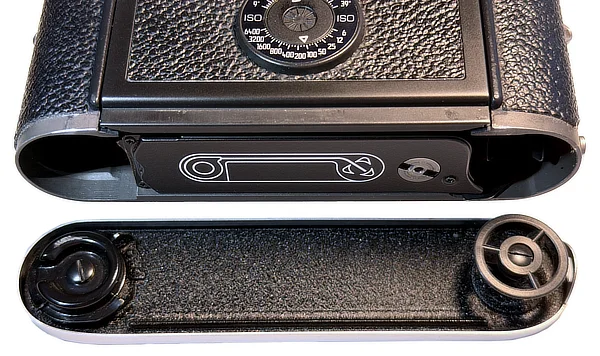
M6 TTL features/ use in detail?
There is already an excellent M6 TTL write up by “Emulsive”, so there is no need to reinvent the wheel.
Controversy Corner
Similar to the R8, the M6 TTL triggered a lot of feelings when it was released in 1998.
Oversized “Wrong way” shutter dial
The s/speed dial has a significantly larger diameter and rotates in an opposite direction to other Leica Ms. Many railed against this as they had been using their Ms for decades by pinching the smaller more elegant
s/speed dial, then turning it the “correct” way. Having to forgo decades of muscle memory to now turn in the opposite direction was needlessly distressing and cruel 😢
TTL at only 1/50th?
More precise flash control was welcome, but it was moot when it only worked with Leica’s underpowered units. X–sync also remained frustratingly slow at 1/50th, ruling out daylight use unless you stopped down to ƒ128 or had a stack of 6–stop ND filters. TTL turned out to be such a damp squib that it was quietly dropped after the Leica M7. Luckily they didn’t change the TTL protocol, so any M6 era flash will work with current Leicas (pay attention Sony…).
“Bloated” dimensions
The new TTL circuitry required more internal space, so 2.5mm was added to the camera’s height, visible by the larger gap between the rangefinder window and top plate. Many people lost their minds over this: They’ve ruined the timeless aesthetic of classic Ms!
“Flare prone” viewfinder
Online wisdom declared Leica was in financial trouble in the late 1990s, so had to skimp on M6 TTL viewfinder glass and coatings. Er, not quite. While the rangefinder focus patch may sometimes flare, under known conditions, it is an issue for all M models between the M3 and MP — see my Leica FAQ.
Zinc alloy instead of brass
The greatest amount of opprobrium was reserved for the retention of (lighter, cheap) zinc alloy for the camera top plate instead of reinstating (heavy, expensive) brass. Zinc had been implemented earlier for the Leica M6, to simplify manufacture and reduce weight, although it may have theoretically made the housing more susceptible to cracking and corrosion. Online arguments about this raged at “New Coke” levels for years — see my Leica FAQ. In time the issue turned out to be overblown. After a few problems with early production M6s (eg. see this M6 with a bubbled cover), by 1990 they were resolved and my 1999 M6 TTL still looks and works like new. Yet Leica was so shell–shocked over the criticism that they reverted to using brass for subsequent M body shells, although to simplify production they were CNC machined instead of multi–step forged.
Things I like about the M6 TTL
The shutter speed dial
Yep. Its larger diameter makes it easy to rotate with your index finder while using the viewfinder. It also has a separate “Off” setting to preserve the battery, unlike previous models which use B for Bag
. I don’t care it rotates the wrong way
. The larger dial was retained on the M7, but dropped thereafter due to persistent whining from collectors and very cross grandads.
The shutter
The amazingly quiet shutter is one of the main reasons for getting a Leica M. It is achieved in part by using curtains made from rubberised silk cloth. They are also very hard wearing — in my 27–year–old M6 TTL the curtains still look and function like new. There are also claims the shutter mechanism is so robust and under–sprung it can handle at least 400K actuations — see my Leica FAQ. There is a trade–off in that the shutter isn’t particularly accurate, with speeds being routinely out by ± ¼ EV, while the top “1/1000th” setting being aspirational only.
Fully Mechanical
It has internal steel gears to cope with motorised use, is completely mechanical and — aside from the lightmeter — is battery independent. As there is no automation to mess things up, this thing is build to last. It is also the final production M which allows use of Leica “IXMOO” brass film cassettes, provided you switch the baseplate. If you want to see how intricately complicated mechanical Leica Ms can be, see this 2026 Leica M4 restoration video (!)
Built–in Lightmeter
Light is measured by being reflected off a grey disc printed onto the shutter front curtain. Which is surprisingly effective as it averages out any scene contrast. Who needs Nikon F4 computer–controlled matrix metering
? The M6 TTL viewfinder display has also been upgraded by the addition of a central LED between two triangles to indicate correct exposure ▶ ● ◀ Only one arrow is lit during under/ over exposure, you then rotate the aperture ring or s/speed dial in the direction indicated until the 3–LED “bow tie” illuminates.
Choice of viewfinder magnifications
0.58 (for 28/ 35mm), 0.72 (general purpose) or 0.85 (for 50/ 75mm). I chose 0.85 as I mostly used 50mm lenses and it has the greatest rangefinder baseline separation for focus accuracy — important for shooting wide open at ƒ2 or beyond (eg. ƒ0.95 Noctilux).
Rare(ish)?
Apparently less than a 1000 silver chrome 0.85 were made, although no one is sure. Considering my simple modifications, I guess my particular M6 TTL is unique 🙃
CR1/3N Battery (+ alternatives)
The M6 TTL lightmeter requires a lithium 3V CR1/3N battery, which is becoming increasingly difficult to source. Not impossible (eg. Amazon), but not trivial either. In Apr 2024 I visited a host of Sydney CBD electrical/ hardware/ camera stores and left empty–handed. A few sales reps had never even heard of them… Eventually I found a couple at a specialist battery store at Sydney’s outskirts — phew! When I vented to the sales rep he gave me a handy tip: they are commonly used now in dog shock–collars, so contact a pet store if things get desperate (!)
Alongside Leica film rangefinders from the M6 onwards, the CR1/3N is also used in the Nikon F2 and F3/T.
Instead of a single Lithium 3V CR1/3N, you can of course use a pair of silver–oxide 1.55V 357/ 303 watch button batteries (aka “SR44”). They are significantly easier to source and slightly cheaper at ≈ $AUD 13 a pair (eg. Bunnings), versus ≈ $AUD 20 for a single CR1/3N. The downside is they don’t last as long in the camera nor in storage (5 vs 10 years), nor work as well in cold/ freezing conditions. At a pinch cheaper alkaline–manganese 1.5V A76/ LR44 cells will also work, although I wouldn’t use them in precision instruments like cameras.
Rapidwinder
The Tom Abrahamsson Rapidwinder (“TAR”) is a trigger operated mechanical film advance which replaces the baseplate of those M cameras with internal steel gears & slotted motor cams (eg. M4–P onwards). It doesn’t work with older models (M4 and previous) since those cameras lack an internal motor cam and use softer brass gears.
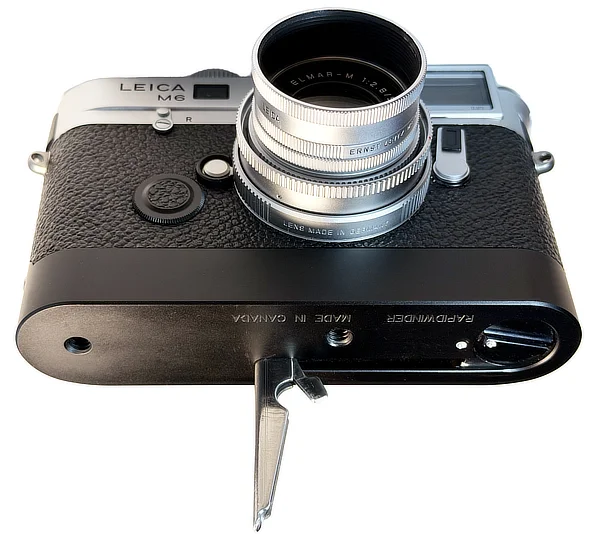
Think of the TAR as a manually operated motordrive, where you advance film by pulling laterally on the spring–loaded lever. You can only advance in one direction because the clutch disengages on the return stroke. You also have to separately press the shutter after each stroke, as you cannot hold it down while repeatedly pulling (yanking?) the trigger. You can however switch mid roll between using the TAR or camera advance lever without removing the camera base.
The TAR was so successful it “inspired” Leica to design their own version in 2003: the Leicavit M (14676). Yet the TAR was mechanically simpler, more reliable and cheaper — see the TAR website and my Leica FAQ.
Unfortunately Tom died in Jan 2017, so you can only get them 2nd hand now, at unconscionably inflated prices. I bought mine new in Oct 2001 and it is not for sale [ Note VIII ].
Leica Motor M
As mentioned earlier, I used a M4–P to shoot mainly 360° panoramas. With a 16mm full–frame fisheye lens this required a sequence of 8× frames to cover a full circle. Initially I advanced the film by hand, but after a few rolls got annoyed enough to buy a Leica Motor M (14408).
It is significantly more compact than the 1980s “Leica Winder M”, with two speed settings of “I” (1.5 FPS) and “II” (3 FPS). Neither is particularly loud — especially compared to the “Hasselpanzer” or Nikon MD-4 !
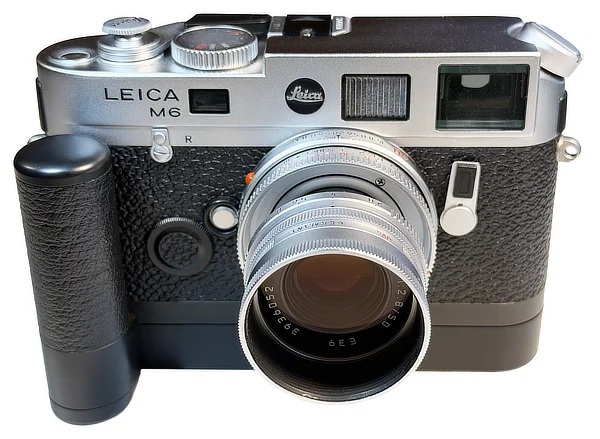
It uses a pair of 3V 123A batteries and unlike the R8 winder or MD-4 motordrive, they do not power the lightmeter — you need an additional CR1/3N in the camera body. This shouldn’t be surprising as there are no electrical connections between Motor M and camera. Similar to the “TAR”, the Motor M allows manual film advance while the motor is still attached, and cannot rewind film.
Worth it? Depends how much you shoot. It is fantastic if you hammer through rolls, but for occasional individual frames — not really. Again, see my Leica FAQ.

DIY Leather Wrap
When I first posted photos of my leather wrap in a Leica forum in 2003, they drew a lot of heartfelt admiration: A case is like sticking a ‘car bra’ on the front of an otherwise beautiful sports car
… That’s the stupidest damn thing I have ever seen!
… Does it come with tatts, studs and a nose–ring?
… I would be ashamed to go out onto the street with such a ^%&#ing ugly thing!
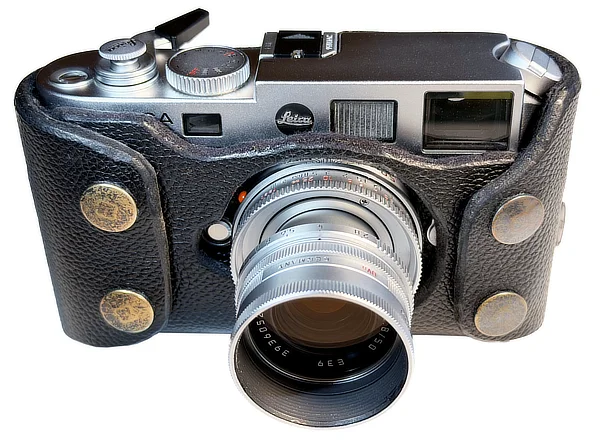
Unlike the bottom half of a Leica 14870 case, my wrap is made from a single piece of 5mm full grain leather hide (with a rolled surface pattern, bought from a tannery). It is lined internally with 2mm felt and held together by four brass press studs. At the rear I cut a 10mm hole for the viewfinder and added a vertical cable–tie with 2× Peak Design Strap Anchors. The leather was cut by hand using electrician’s shears + an artist’s scalpel, then the edges were finished with a fine emery board and paint pen. The leather was treated with preserver then Dubbin. The photo was taken in Nov 2025, 22–years after I made it. Like its maker it has aged rather well 😉
Rationale? Cheap; No need to fumble with a “never ready” case as the camera is always ready; It keeps greasy finger marks off the body; It helps protect the camera from scratches and bumps; It muffles the shutter sound a lot, although not as much as a dedicated blimp; Is soft, pliable, feels & smells (!) great.
Do I sell them? No. Can I send you a template? No.
I notice you can buy “Artisan & Artist” half–cases now, but they are significantly thinner so won’t muffle the shutter nor protect the body as much.
Leica M Accessories
Over decades I have found the following useful:
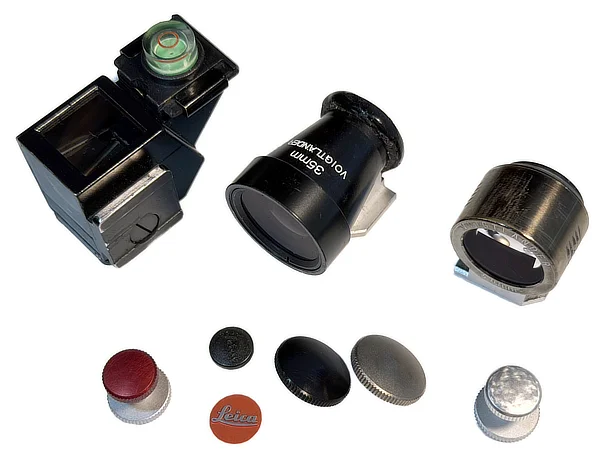
“AUFSU” finder
An accessory right–angle viewfinder made in the 1930–40s, which slides into the camera's flash accessory shoe. It can be used in landscape or portrait format, and contains a tiny silvered pentaprism to display the scene right way up with correct lateral orientation. As you can imagine it is fantastic for candid shots, although I find the image rather small for Ol’ Man Eyes. I have added a hotshoe bubble level to help reduce “Dutch angles”. In recent years collectors have pushed up prices to ludicrous heights. More detail at my Leica FAQ.
Brightline Finders
I have two by Voigtländer: 35mm and 50mm (see YouTube video). They act as auxiliary viewfinders with (very) bright frame lines and are only useful for framing, as they don’t couple with the rangefinder. Again, see my Leica FAQ.
Abrahamsson “softies”
These were made by Tom Abrahamsson from 7000 series aluminium and (with great difficulty) anodised. From L to R in the photo: red mini, black chrome regular, titanium regular, silver chrome mini — the latter I buffed into a mother of pearl finish.
Flash sync terminal socket cap
You can get generic plastic versions for spare change. Original Leica versions are laughably expensive.
Leica “red dot” badge
In the early 2000s they were a spare part you could order directly from Leica as Badge circular ‘Leica’, 710 271 000 000
. They were (of course) expensive and I don’t know if they are still available.
Shooting with the M6 TTL
Since most of my work is now digital, I don’t use the M6 TTL anywhere near as much as I did twenty years ago. Even when I shoot film it’s mostly 120 medium format. I also prefer the Leica R9 or Nikon F5 for the (very) occasional roll of 135. Yet… there is nothing like working with a rangefinder camera. Maybe one day I will get a 2nd hand (digital) Leica M10–R (20003). Maybe. One day…
PN&T — Parts 2 & 3
Next → Part 2: Film, filters, lighting & lightmeters
Last → Part 3: Digital cameras & photography
Copyright — All Rights Reserved ↑
Unless noted otherwise, everything in this article is and remains the sole copyright of its Australian author.
Although you are permitted to view this material online, no other use, reproduction or implied license is allowed without the author's prior written consent.
The internet may still be free, but intellectual property is not.
Notes ↑
Original Version February 2026 — all rights reserved