PN&T 2 — Film, Filters & Lighting
Photography Now & Then
(PN&T) is a personal journey about cameras, lenses, films and digital imaging I have used since 1980
(When citing this article, please use photonat.4020.net
)
| Topic | Description |
|---|---|
| Shooting Film | Film & processing for B&W, K–14, E–6 and C–41 |
| Lens Filters | Using filters for B&W and colour; film or digital |
| Gossen lightmeters | Incident/ flashmeters: Luna–Pro F, Sixtomat Flash & Digipro F |
| Working with Flash | Studio strobes, camera TTL, compact manual flashes, exposure metering & continuous tungsten/ LED |
| Stories | Greta Garbo II |
 Proudly and defiantly, no AI was used to create this article
Overview
Photography Now & Then
was originally a single article, but has since been split into three sections:
- Part 1 — Film cameras
- [ link ] Nikon & Leica 35mm cameras, Hasselblad & Mamiya 120 medium format
- Part 2 — Film, Filters & Accessories
- [ link ] B&W negative, colour transparency and negatives; Film processing; Lens filters; Hand–held lightmeters; Flash & continuous lighting
- Part 3 — Digital Cameras & Photography
- [ link ] Sony & Leica mirrorless cameras; Digital workflow, issues, impact of A.I.; The importance of your own website
Working with Film
Film photography has enjoyed a renaissance since 2015. Not only are the cameras (generally) simple and compact, but they are also great fun to use. Improvements in scanning technology have meant you can now easily produce 24MP (or higher) resolution digital files, which can deliver fantastic image quality for screen or print use.
Section Quick Links
- Why film?
- B&W vs. Colour
- B&W negative films
- B&W film processing
- Colour reversal films
- Colour negative films
Rationale ↑
Most of my work now is digital, yet I still occasionally shoot film. Not so much for a retro film–look aesthetic
, but simply because I enjoy using film–era cameras (see Photonat Part 1).
With mechanical cameras there is no forest of menu options. No chasing the focus point around the viewfinder. No nose–activated hypersensitive touch–screen. No autofocus lock. No half–remembering which dial does what. No continuously draining battery (ahem, aside from the Nikon F3/T). No beeping audio feedback you have to drill twenty levels down to silence. You get a clean, simple haptic interface. A clearly marked lens aperture ring (usually) and body s/speed dial (on the Leica IIIG you get two). A bright and clear viewfinder with manual focus aids. You measure the light, set the aperture + s/speed, then focus, wait for the right moment and take the bloody shot.
It saddens me that so few digital camera makers understand this and insist on ramming various amounts of automation down your throat to make things “easier”. Sigh. Should you wish to use digital cameras with manual–only control, then your only options are luxe offerings from either Fuji or Leica (I’m looking at you M11–P…)
Yet film has one other benefit I suspect will eventually bite most digital users: longevity. In 2023 I high–rez rescanned my favourite film images from the 1980s & 1990s. Some of them were more than forty years old, yet due to careful processing, storage and luck, they were still in excellent condition and the 40MP scans look spectacular. I extracted tones and details I had never seen before, whereas I’m certain no one is going to be extracting anything from RAW digital files in forty years time…
To be clear I do not miss the drawbacks of film: the forever–increasing expense, or sweating in a “dankroom”, or engaging in photochemical warfare when mixing solutions and rocking trays. Nor do I miss having to retouch scratches and dozens of ^%&#ing dust spots. Even today, working with film requires far too much guesswork and finger crossing. Development remains a PITA (Why won’t this damn film slide into the processing reel?
Is the developer still okay?
Is the fixer exhausted?
Crap, the negatives are too thin. The solution must have cooled during development.
) So aside from developer or toner fumes, I’m not misty eyed about any of this and, to be frank, nostalgia only works if you have a faulty memory.
As a result, I now use film as just the first step in an otherwise digital process.
While completing this article in Feb 2026, film prices increased by ≈17% due, in part, to a speculative bubble in silver bullion & futures contracts. Good and bad news. The bad is obvious → more $s per frame. The good is that it will force everyone to do what I’ve been saying all along: Make Every Shot Count.
B&W vs. Colour ↑
I have written about this already in my Critics
essay elsewhere on this site, so will keep it short.
You see the world in colour, why be averse to recording what you see? B&W is an obsolescent medium invented only because colour technology wasn’t available at the time. It’s not as though people said Y’know what? Let’s ignore colour so photographers can concentrate on capturing people’s souls…
That said, I appreciate the abstraction (and processing simplicity) of B&W. Most images work in colour, some in B&W, and despite self–righteous highfalutin grandstanding informed discussion in online forums, the requirement to shoot exclusively in B&W to avoid distractions
does not in my universe form the Eleventh Commandment.
Black & White Film ↑
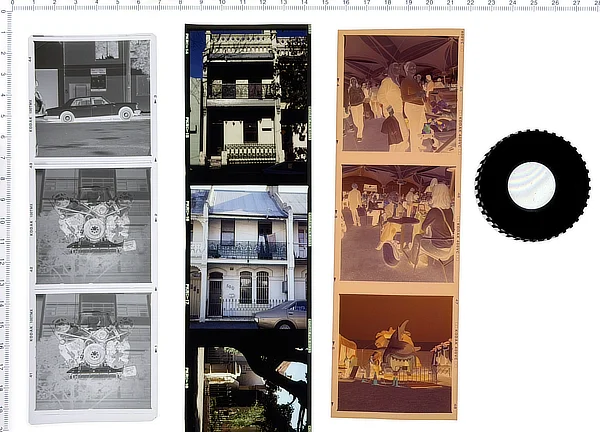
Over decades I have tried an enormous variety of B&W films, but have settled on only 2–3 for current use.
For 120 medium format I prefer Kodak TMAX–100. During 1980–2000 I was a huge fan of Ilford films and papers (and still use their Perceptol & Hypam darkroom chemicals), but over time found their FP4+ and later Delta 100 emulsions too grainy in comparison to TMAX–100.
If I need something faster then I opt for 400 ISO Kodak TMAX–400. I tried Ilford HP5 a few times, but again found it too noisy for my taste. Back in the 1980s I used to push–process Kodak Tri–X to 1600–3200 ISO, but there is no longer any need due to vastly superior digital capture in low–light.
135 format results will always be grainy no matter what. This is due to the greater enlargement ratio required by the smaller frame size (“135” = 24×36mm vs. “6×6” = 56×56mm vs. “6×7” = 56×69mm). Over years I have tried 135 versions of 100 ISO Ilford 100 Delta Professional and Kodak TMAX–100, but was never completely satisfied. In the 1990s I used Kodak Technical Pan 2415, which was amazing yet slow (25 ISO), red sensitive (great for skin tones, not so good for red lipstick or nail varnish) and required a special developer. It was however exceptionally fine–grained and sharp, yielding impressive 40MP scans decades later. Unfortunately it was discontinued in 2004, mainly due to its stiff “Estar–AH” base, which tended to jam in motor–driven cameras or when being fed into auto–load developer reels.
In March 2026 Kodak replaced their TMAX range of B&W films with EKTAPAN. The new film inherits the T–Grain emulsion used in the original TMAX stock, so it appears to be more of a rebrand than a reformulation. Time will tell.
As mentioned earlier, I mostly shoot 120 medium format now, so a lack of satisfactory 35mm options is not too limiting. But never say never. In Dec 2025 I started experimenting with Ilford Pan F Plus. At only 50 ISO it is slow, especially when using a −2 EV orange filter, but initial results are promising (albeit not overwhelmingly superior to Kodak TMAX–100 🤔)
I tend to buy 135 film in 30m rolls or 120 in multi–pack lots, then store them in their original packaging in a freezer at −18°C. My freezer has a shallow middle tray which is ideal for this:
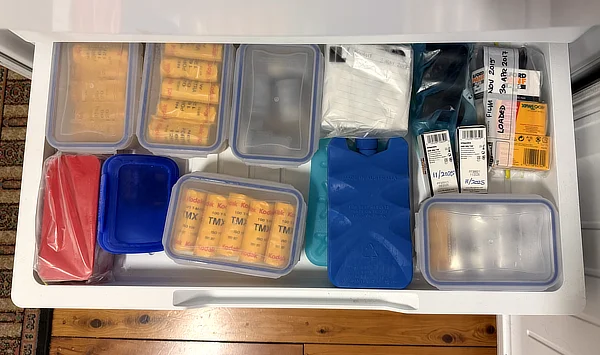
Unopened film is thawed for 2–3 hours prior use to prevent condensation on the film surface. Kodak have a Technical Information Bulletin about this: Storage and Handling of Unprocessed Film
(2022). See also their Storage and Care of Kodak Photographic Materials
(2017) for tips on archival storage.
B&W Processing
To my amazement a lot of photographers outsource this to labs or friends or random people they met at camera fairs or on the dance floor. Not me. As far as I am concerned, choosing the right film + filter + lens + camera is only part of the equation, making the little Ag granules snap to attention is the remainder.
Ceaseless experimentation in the early Nineties has yielded the following B&W processing workflow:
Development
Ilford Perceptol at 1+1 dilution. Perceptol for fine grain and 1+1 dilution for improved acutance and easier temperature control. It’s a one–shot process, so you discard the solution after use, guaranteeing fresh developer every time. One litre of full–strength concentrate, after 1+1 dilution, is enough to develop four 120 or 135 format films. I tried 1+3 dilution once, but the acutance became so exaggerated it overwhelmed the film’s grain structure. The necessary increase in development time was also ridiculous (≈20 minutes).
You only perform the 1+1 dilution when you are ready to develop the film. I keep the developer concentrate in airtight 250ml bottles filled to the brim and stored in a dark cool box. When I am ready, I grab one of the bottles and dilute its contents to 500ml using tap water to obtain the 1+1 solution at the desired temperature (21–23°C).
Figuring out the correct development time(s) for each film used to be voodoo, but it’s much easier now. Look up your film at the Ilford Films colour development chart or The Massive Dev Chart database, then apply temperature time corrections using the Ilford Temperature Compensation Chart.
I have done this for my favourite films, then created an Excel spreadsheet + PDF chart to display on my iPad during development:
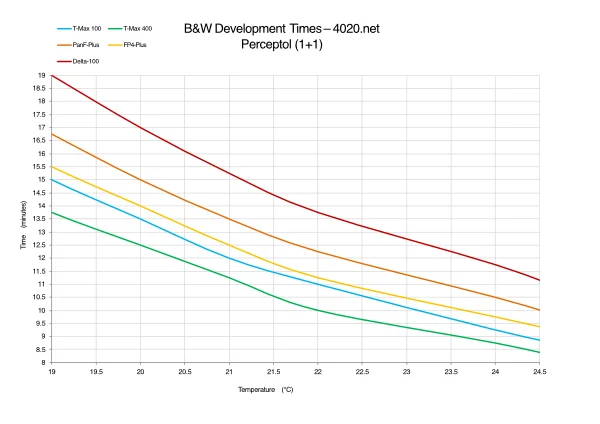
The same development technique is used for every B&W film:
- Dilute the developer concentrate to 1+1 solution in a Pyrex measuring jug
- Get everything thermally equilibrated by pre–washing your loaded film in tap water for 2 minutes at the desired temperature. This will also remove the film anti–halation backing for 120 rollfilm
- Pour in the developer, start the clock, aggressively tap the tank to dislodge air bubbles and give 30 seconds initial agitation, followed by 5s every 30s
- I prefer using a spindle for rotary agitation instead of the more common inversion method, mainly because the tank lid came off once and spilled developer everywhere 😡
- I try to keep the solution temperature at 21–22°C, although it can be challenging in winter
Have used various Patterson daylight tanks for over forty years. In 2016 I replaced the OEM Patterson film reels with a pair of Omega alternatives, which have longer film guides to enable easier loading, especially with curly 120 film. (BTW it helps if you round off the film leader corners with scissors prior to feeding into a tank reel.)
Lomography have recently released a Lomo Daylight Developing Tank 35mm. I notice it uses a steel clamp to keep the bloody lid on during inversions (!) The daylight loading mechanism looks interesting, although I’ve seen reports it can tear the sprockets of thinner films. Opinions vary.
Stop bath
Among other things I am an ex–industrial chemist, so I use ≈1ml of glacial acetic acid in 500ml of water, which is sufficient to stop a freight train, let alone developer. For LOLs I once used a couple of drops of oleum, which worked fine but was a bit maxtreme, even for me. Those who frighten easily can instead use a splash of vinegar or (quelle horreur) a commercial stop bath.
Fixer
This one is easy: Ilford Hypam at 1+5 dilution. Slosh it around for 4–5 minutes and pour it back into the storage bottle to be reused. A litre of diluted solution is adequate for ≤ 5 rolls.
Wash
Twenty years ago I used to add hardening agent to the fixer to reduce film scratches and improve drying times. The catch was having to wash for at least 60 mins in running water. As I no longer use hardener, 30 mins of running water is enough. A gentle flow of 1 litre/min is adequate, barely enough to flush residual chems off the film and out of the tank. Yes it’s a serious waste of water…
Drying
It took a lot of trial & error to get this right. Fill the tank with warm water at ≈45°C, add 5 drops of Kodak Professional Wetting Agent 200 and agitate to get a nice foam. Don’t use too much wetting agent as it will leave bubble artefacts on the dried film (!) Then hang the film to dry with weighted s/steel clips. Do not squeegee off excess water, let it trickle down. Since the surfactant solution is quite warm, its surface tension is low enough for the solution to run off without leaving drops or residue. Hang the film in quiet room and wait ≈4 hours to air dry. For LOLs I once hung my film out to dry with the laundry on a windy day on a backyard clothesline. It dried super fast, but the amount of dust/ pollen/ dog hairs (saliva?) on the film was a touch excessive.
Storage
Processed 120 films are cut into strips and stored in Print File Archival Storage Page sleeves. Which are truly archival, as I have films which have been stored in them for forty years without deterioration.
“Keeper” shots on 135 film are cut into individual frames and mounted in glassless GEPE plastic slide mounts, which are then slotted into Print File slide–holder archival sleeves. The GEPE mounts don’t seem to be available anymore, although similar alternatives work fine.
Digitising
I still occasionally use an antiquated Epson Perfection V700 scanner with VueScan software, especially for 120 film, but from 2024 onwards have been digitising my films using a home–made digital camera copy rig. Since there are plenty of articles and videos about this already: Google it mate
.
Colour Reversal Film ↑
When I started shooting colour in the 1980s, I initially used C–41 negative film. It was relatively cheap, easily available and there were minilabs everywhere for quick & inexpensive processing. Unfortunately the convenience ended there, as I had a devil of a time trying to get decent quality colour prints or (much later) scans.
The problem was you couldn’t evaluate the colours by merely inspecting the orange–masked negative. Which opened the door to lousy guesswork from disinterested (colour blind?) lab technicians. High–volume wedding and portrait photographers worked around it by setting up their own RA4 print machines, to get prints done with reasonable colour fidelity. Not an option for us little guys.
I found I had to photograph a colour test target at the beginning of every C–41 roll, with standard RGB and CMYK elements, for lab technicians to pretend to use. Part of the reason Polaroid proof–prints were so popular at the time was to provide colour samples to guide our visually impaired “Pro Lab” friends.
Enter Plan B, colour reversal film. Aka “transparencies” or “slides”. No more guesswork, WYFSIWYFG. Colour fidelity was no longer an issue since you had a master image with all the colours exactly the way you wanted them. No more arguments 💕
With reversal film you placed the original onto a calibrated lightbox and kept adjusting the scanner or printer CMYK settings until the two (reasonably) matched. In the pre–digital era this explains why magazines and advertisers only accepted image submissions on reversal film (or at a stretch hard–copy prints).
Restricted Dynamic Range (D/R)
The trade–off with transparency film is its limited exposure latitude of ≈5 ƒ–stops. Ignore assertions it has 8, or even 12 ƒ–stops (eg. for Kodachrome 25): these are best–case scenarios from lab density measurements, not real–world experience. The adage of expose for the highlights and let the shadows fall where they may
came from shooting slide film. Highlights routinely blew out, shadows remained unfathomably dark. Some people liked it; others built their careers upon it (eg. Alex Webb); I found it frustrating. To brighten the shadows when shooting you often had to use fill flash, scrims and/ or reflector boards for just about everything, indoors or out.
Mixed lighting/ Mixed results
With film there is no AWB, so the greatest issue is having to deal with artificial light when using daylight balanced film. Since there is no such thing as “objective” colour [ Note II ], film chemistry can only record what is actually present and not what our minds “see”. Thus light from fluorescent “daylight” tubes will be rendered emerald–green, while tungsten filament light–bulbs are presented as yellow–orange, despite our minds reporting “white” for both. When artificial light is mixed with natural light, colours can go berserk: see the Dean Stockwell Camelot service station scene in Paris Texas (1984) or Alex Webb’s A City of a Hundred Names
(2001).
An 80B (blue) filter will tone down tungsten orange, while a CC30M (magenta) addresses fluorescent green. Yet more stuff to carry around. Unfortunately CC filters absorb light and thus reduce the effective ISO, necessitating longer exposures. Cinematographers don’t muck around when doing this stuff, they gel all the light sources with (sometimes enormous) CC filter sheets and adjust until they have exactly the colour they want. Not really an option for “run–and–gun” candid street photographers…
FWIW I always use a faint blue 80C filter to boost the blue channel when shooting indoors
Reversal films came in two broadly different types depending upon their processing chemistry:
- K–14 Kodachrome
- E–6 Ektachrome (or Fujichrome etc.)
Kodachrome (K–14)
Kodachrome was a magnificent film. Don’t be fooled by lousy scans of images taken in the 1940s and 50s displayed online. Colour photos from this film were made to last and I have shots from the early 1980s which look like they were taken yesterday: no fading, yellowing or red dye “cyanification”. Because there were no dye–couplers in the film structure, it had fewer layers, making it thinner and consequently sharper than any other colour film, an important feature when shooting onto “miniature” formats like 135.
The resulting colour was also excellent. Neutral but with a touch of saturation to make things pop. Kodachrome 64 (64 ISO) was good for general use, with Kodachrome 25 (25 ISO) for hyper–sharp sunny landscapes. Kodachrome 200 (200 ISO) also became available near the end, but I found it boring compared to K64.
So what’s not to like?…
Strong contrast
As mentioned earlier, reversal film has an inherently limited dynamic range which makes it contrasty. Kodachrome took it to the next level. You worked around it best you could by exposing for the highlights, but sometimes you wanted to see what was in the shadows, right? Thus a reflector card and/or fill–flash was almost mandatory, despite 35mm cameras at the time having slow X–sync speeds [ Note I ].
Limited formats
For decades Kodachrome was only available as 135 rolls, with 120 medium format (eg. PKR–6033) only introduced in the late ‘80s, and even then discontinued a decade later.
Limited Processing
K–14 was such a complex and toxic process that, outside of the USA, each country had only one centralised processing facility. In Australia it was the Kodak factory at Coburg outside Melbourne. For anyone who didn’t live nearby, this meant relying on the postal service to transit film across the country. Two–week turnaround times from Sydney were not uncommon. Neither were lost films. Towards the end Kodak closed their Coburg plant and film then had to be shipped to the next closest facility… in Johannesburg, South Africa.
Slide Mounts Only?
Processed Kodachrome was returned mounted as individual frames in cardboard (or for a while plastic) slide mounts, by default. Few people realised you could request your film be returned uncut as a single roll, by clipping the mysterious dashed corner off the yellow prepaid film mailer envelope.
End of an Era
Kodachrome was already rare in the late Nineties, but somehow managed to limp along for a few years until it was discontinued in 2009. The last roll of K64 was shot by everyone’s favourite photoshop jockey photojournalist Steve McCurry in 2010 (see also the frame–by–frame analysis of the 36 images).
-

This K64 shot of Franklin Dam protesters was taken in Feb 1983 and still looks new. Notice the murky shadows due to the film’s limited D/R
Ektachrome/ Fujichrome (E–6)
Turnaround times for Kodachrome in Australia were brutal. As were its high contrast and any size you like so long as it’s 135
limited format.
Commercial photographers usually worked with larger formats — 120, 4×5 or even 10×8 inches — so Kodachrome was out. Wedding/ portrait photographers mostly shot C–41 due to its broad exposure latitude and rapid processing/ print times, especially if they were busy enough to warrant their own minilab.
Due to the publishing/ reproduction demands of magazines and advertising clients, commercial photographers had to shoot colour transparency film. Yet they also needed a range of film formats + rapid turnaround times…
Enter E6 Ektachrome.
Kodachrome’s Poor Cousin?
Until the mid Eighties, correct. The release of Ektachrome 64 in 1976 didn’t fool anyone, but it was available in a range of sizes and got the job done. E6 films eventually came of age in 1988 with the release of EPP–100 (Kodak Ektachrome Plus Professional 100 (6005)
). It was reasonably sharp (see below), had excellent colour and fine grain. Surprisingly it also turned out to be quite stable: I have EPP–100 shots from the Nineties which still look great (!)
Fast local processing
This was E6’s trump card: you could have it processed in a couple of hours at Professional Labs dotted around Sydney. I used Vision Graphics at North Sydney, then changed to Visual Image Lab in Redfern. Am amazed both are still in business, although the third lab I used at Holt Street Surry Hills seems to have closed.
A range of film varieties
Not only different film sizes, but a variety of E6 film types, ISOs and different manufacturers. In the Nineties Fujichrome Velvia 50 was immensely popular, especially for those who liked their colour saturation at “11”. I detested it, and wryly note its faster cousin Fujichrome Velvia 100 was not only toxic aesthetically, but chemically as well.
Tungsten Balanced options
Ektachrome 64T meant you didn’t have to monkey around with 80B CC filters. Tried it a few times but hated it. At least the option was available.
Sharpness?
Nup. Kodachrome was king, although EPP–100 kinda got close. The main issues were the extra layers of colour couplers in the E6 film structure, which Kodachrome avoided. Part of the reason professionals shot onto larger format films (120, 4×5 etc.) was to reduce enlargement ratios to minimise the impact of E6 film’s inherent blurriness.
DIY processing
Yes! You could buy kits to develop E6 film in a standard daylight tank. I did it once in 1981 with a 12–step E6 process, which was convoluted enough to never do again. You can get 6–step kits today, although with severe shipping restrictions due to the dangerous chemicals involved…
Digitising
Digitising transparency film is relatively straightforward. You have the original for reference and can easily tweak your scan to match. If you digitise using a camera, you can use the camera’s built–in AWB to ballpark the colours.
After an initial E6 “scan” I can get a good colour match in about ten minutes and exact within thirty. With C–41 and its ^%&#ing orange mask, even with years of practice, it can take hours of fiddling to get things right.
Colour Negative Film (C–41) ↑
Films
In the 1990s and early 2000s I shot kilometres of this stuff, both in 135 and 120 formats. It has a tremendous exposure latitude of at least 12 stops, fine grain and, unlike E6 transparency films, is sharp. It is also far more forgiving when used in mixed daylight/ artificial light.
In 120 medium format I prefer Kodak Portra VC 160. Great skin tones, sharpness and fine grain. I still have a batch of 16 rolls in my freezer, despite expiring in 2013. I sometimes shoot a test roll and it (amazingly) still works.
The 135 format films I used in the early 2000s are no longer made (eg. Kodak Supra 200). The current Kodak Eastman GOLD 200 should work fine, while Cinestill films are also generating a lot of buzz.
In March 2026 Kodak replaced their PORTRA range of films with EKTACOLOR. Similar to their new B&W EKTAPAN film, EKTACOLOR seems to only be a rebrand instead of a reformulation.
Processing
C–41 film used to be easy and cheap to get processed. Every suburban shopping centre had a Nortisu or Fujitsu minilab, so you could conveniently get it done while shopping. As I used to get 5–6 (135) films developed each week, I quickly befriended a couple of minilab owners and they would put my films through in less than an hour. For 120 film I had to use pro labs in the CBD, whose turnaround times were 3–4 hours, or 1–2 days if you weren’t in a hurry and wanted to save a few dollars.
That was twenty years ago. Today C–41 labs still exist, but you have to hunt around and be prepared to wait. Best options are via better photography stores like DigiDirect or Sydney Super8. There are also dedicated film labs like Live Forever Film Lab in Surry Hills.
DIY home processing is another alternative. In 2013 I bought six Tetenal C–41 Press Kits but never used them as I was wary of their strict ±0.1°C development requirement. Likewise the short shelf–life for solutions once mixed. Since at the time C–41 processing was still easy to get done at suburban minilabs, I couldn’t be bothered tinkering at home [ Note VI ]. I still have the unopened Tetenal kit packs. Wonder if they will still work after thirteen years?…
Snafus
The killjoy for C–41 film is its orange mask base. I acknowledge it was done to compensate for imperfect CMY dyes and because original paper stocks couldn’t handle the contrast range of colour films. Fair enough but come on, most people digitise this stuff now and the orange mask screws everything up. For good measure, different C–41 films use differently tinted masks, crippling your ability to standardise a software workflow [ Note III ].
Scanning software, eg. VueScan or FilmLab, will do most of the heavy lifting, but you still have to fine–tune the RGB channels forever. Since my preferred RAW editor only grudgingly implemented C–41 support in March 2026, there was no alternative to converting C–41 “scans” other than laboriously by angry fists banging on the table hand.
Profile support or not, when digitising a C–41 shot you need to set aside at least an hour to manually adjust/ tweak/ voodoo the RGB balance. Then add another epoch to spot–retouch every dust spot and tiny little hair. For every bloody image…
-

It can take forever to get C–41 colours “right”, but at least it has an extensive D/R. Here transparency film would have blown out the skies
Lens Filters
Introduction
These have fallen out of favour over the last twenty years. Which is understandable as they are expensive and a lot of the effects they provide can now be easily achieved in post, either in a RAW or Photo editor.
Yet I still use them, especially for B&W photography. UV protection filters are also practical and indeed have saved two of my lenses from expensive (perhaps irreparable) damage.
One major caveat though: aside from UV/ Haze filters they all absorb light, which results in longer exposures. For Neutral Density (ND) filters this is obviously the point, but for others it can be a nuisance.
Filter Notes ↑
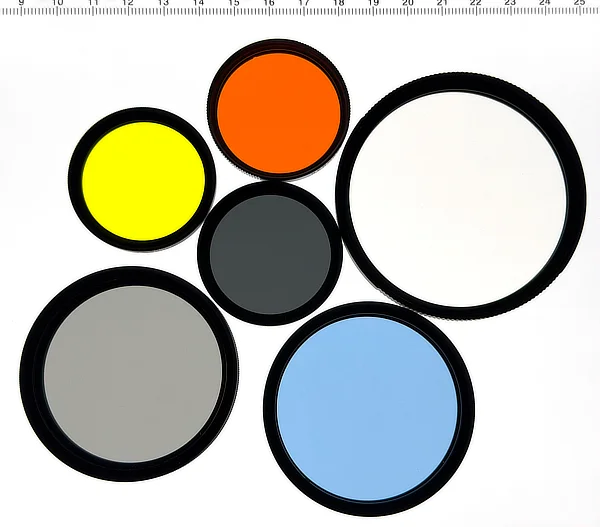
Orange
These significantly darken blue skies for B&W shots. Not as dramatically as with a red filter, but a notable step up from yellow. They typically have a 4× filter–factor, so you need to increase exposure by 2 stops (eg. ƒ8 instead of ƒ16). They are also useful for colour work during sunsets, although on digital cameras it’s a good idea to dial back the effect a little using the “custom colour temperature (K)” White Balance option.
Yellow
For B&W these darken blue skies and green foliage, although not as much as orange. They also lighten skin tones, which can otherwise end up too grey. They are great for general purpose B&W and I have one on each of my Mamiya C330 TLR lenses. They have a 2× filter–factor, so you need to increase exposure by 1 stop.
UV/ Skylight/ Haze
Their original purpose was to reduce bluish haze in distant landscapes, as film can sometimes be overly sensitive to UV. With digital they are mainly used to protect the lens front element from spills, sparks, shanks, accidents etc. I have nearly indestructible UV filters by Aurora Aperture, made from Gorilla Glass, for most of my full–frame lenses, although I don’t use them on my Hasselblad nor Leica R macro lenses as those front elements are recessed deeply enough to be adequately protected. Aurora filters aren’t readily available anymore, but there are plenty of good substitutes like Kolari Vision Pro UV Cut or NiSi Armor FX UV etc.
Neutral Density (ND)
Want to shoot at ƒ2 in bright sunlight? ND filters to the rescue. Video shooters also use them to reduce light intensity to follow the “180° shutter rule” to shoot in bright light at only 1/50th. I have two 4–stop NDs in different sizes (E39 and 67mm), the former for Leica M lenses and the latter for various Leica R lenses and my SEL1655G APS–C zoom.
I should mention graduated ND filters used to (selectively) darken skies. Here the upper half is a ND filter but tapers to clear at the bottom. In practice the ND portion of these things can deliver a different colour to the clear portion, particularly a magenta cast to cloudy skies (URTH claim to have solved this). TBH I haven’t used graduated filters for years because you are better off darkening skies in post.
Polarising
Years ago I routinely used P/L filters for colour (film) work, but rarely do so now. Their main purpose was to reduce reflections off smooth surfaces like glass or marble, along with darkening blue skies. Unfortunately they also reduce reflections off skin, resulting in bizarre suede effects. Likewise water bodies at certain angles can end up looking weirdly unnatural. Then sometimes the sun is in the wrong part of the sky, resulting in minimal if any darkening. As for Circular vs. Linear polarisers: the former are required by cameras with semi–silvered mirrors or beam splitters (DSLRs, Sony SLT), while the latter work with everything else. It’s a moot point nowadays as most available P/Ls are circular.
Colour Correction (CC)
These are white balance correction filters to shift the light source colour temperature. 80 (A,B,C) is for blue/ cooling and 85 (A,B,C) for amber/ warming, with FL–Day to correct fluorescent. Putting on my Physics Teacher hat, the blue filters increase colour temperature while the red ones lower it. Hoya have given their CC filters different names but they are the same thing. Many argue they are redundant now for digital cameras since built–in AWB does the heavy lifting. I mostly agree. But if you know you will be shooting under (say) fluorescent light, you can nail the colour balance if you use a FL–Day filter to assist the camera. Likewise a faint 85C when shooting under LEDs is handy to dial down the blue–heavy spectrum.
Close–up lens
Eg. a Sigma AML72-01 which provides 1:2 magnification (≈1.75 dioptre). It has a 72mm thread and with step up/down rings can fit (almost) any lens. I use one on my SEL1655G whenever I need to get close(r) but haven’t packed a Macro. At the lens maximum focal length of 55mm, the closest focus covers an object area of 110×80mm; with the “AML72” it is considerably smaller at 80×50mm. Close–up filters used to have very poor reputations (ahem, aside from the specialised Leica ELPRO 1:2–1:1 Near Focus Attachment (16545) !), but the “AML72” is surprisingly good, plus cheap enough to not worry about losing it or getting it scratched. Indeed my NiSi 67→72mm step up ring cost twice as much as the filter [ Note IV ].
Soft focus
These are a complete waste of money. Get a cheap UV filter and apply Vaseline. In my case I stretch (and I mean really stretch) black stocking material over the front of a lens. Black fishnet also works for a more subtle effect. This is for when you wish to soften things during in the shoot, otherwise it’s easier to create the effect in post using a Photo editor.
Gossen Lightmeters
I have used the following hand–held lightmeters since the 1980s. They are all German–made by Gossen and have never let me down. In the late Nineties I flirted with Sekonic and Minolta alternatives, but found them either too naff (S) or fiddly and expensive (M).
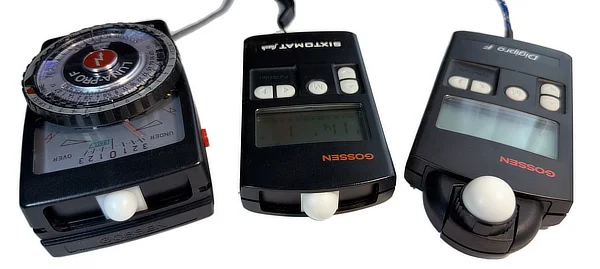
All three Gossens support flash and EV scale readings, which dovetail nicely with EV settings on Zeiss Hasselblad lenses.
Section Quick Links
Measuring Exposure ↑
When estimating photographic exposure there are two ways of measuring light: “reflected” & “incident”. “Reflected” is done by every TTL camera, where light goes through the lens and electronic sensors inside the camera figure the aperture and s/speed with reference to the ISO. Alternatively for “incident”, you use a separate hand–held meter to measure the amount of light falling onto a scene.
Reflected readings are fast and convenient as they are built into cameras. The problem is they all assume a scene’s average reflectance is 18% grey, which it seldom is, especially if it is predominantly black or white. Reflected readings will thus always be inaccurate for photos on the beach or on snowy hillsides, 3D Color matrix meter with 1005-pixel RGB sensor
or not.
With mirrorless digital cameras you can immediately see if the exposure is off and adjust accordingly. With DSLRs you chimp. With film you shoot first and hope later. Hence the reason pros shot a lot of Polaroid instant prints in the Eighties & Nineties, to get the exposure right before to recording onto film (which was expensive even back then).
Incident readings cannot be fooled by a scene’s colour or contrast, as they directly measure the intensity of light falling onto a scene. To do this you need a hand–held meter and then stand in front of the scene/ person/ object you need to measure.
As a result incident readings are nearly always accurate, although (obviously) they don’t work so well for fast action or long telephoto shots. In which case you need to revert to reflected readings and compensate (and hope). Many people use spotmeters, but despite being more precise they still suffer from measuring reflected light.
Even today I still pack a hand–held meter for incident readings. With digital it isn’t strictly necessary, but call me old school. It remains however essential for metering flash photos.
Luna–Pro F ↑
In 1982 my first proper lightmeter was a well–used 1960s Gossen Lunasix 3. It worked well for daylight but couldn’t measure flash, forcing me to rely on dodgy G/N calculations or built–in flash auto thyristor control.
In 1990 I had enough and got a decent flashmeter: a 2nd hand 1980s Luna–Pro F:
- All exposures were correct thereafter 🎉 😀
- Measures daylight and flash, or any combination thereof
- Uses a PP3 9V battery, which lasts forever with a Lithium 1200 mAh cell
- The film–speed dial is still in “ASA” since “ISO” only superseded it in 1987
- Mine is the
Luna–Pro F
, but it was also sold as theLunasix F
- I mostly use it in incident mode, although its spherical white diffuser can be slid out of the way for reflected readings
- In 1992 the retail price was $AUD 695 ($1655 in 2025), hence buying 2nd hand!
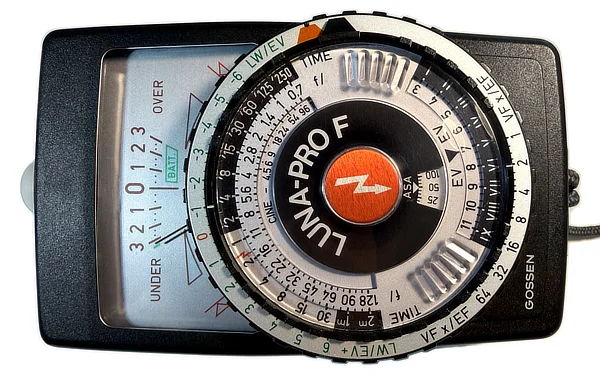
I sold it after a few years when upgrading to a Sixtomat Flash (see below), but missed the retro dial so much I bought another in Mar 2017. I continue to use it for 120–format B&W, but the tiny aperture and s/speed numbers are now difficult to read without glasses 🔍
Being an ‘80s relic with an analogue needle + magnetic coil + 9V battery, it is bulky, which can make pocket storage awkward…
I had originally wanted a Profisix SBC, which had an extensive range of accessories and was claimed to be the most professional of Pro
lightmeters. Ironically for flash use, the cheaper Luna–Pro F was a better choice as it already had flash functionality built in, whereas the Profisix required an additional “Profi FLASH” attachment.
Sixtomat Flash ↑
Bought this to replace the Luna–Pro F, as it was thinner and solid–state with no fragile moving parts. Of all my lightmeters the Sixtomat Flash has seen the most use, having measured 10Ks scenes for more than twenty years. Like the Luna–Pro F, it can measure ambient or flash or any combination thereof.
Despite its all–plastic build, it’s a robust thing with an easy to read display (without glasses!). It uses a single AA 1.5V battery which in Lithium 3000 mAh format lasts years. My only issues are having to hold the meter horizontally when doing measurements and the white diffuser sphere being a bit small.
Gossen make an updated “F2” version with red buttons and a few additional markings, but I haven’t bothered upgrading as it is basically the same meter.
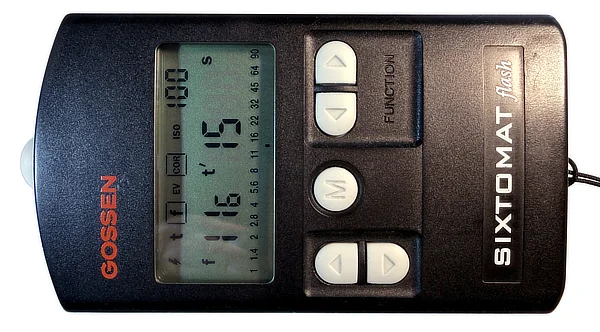
Digipro F ↑
Around 2010 I was looking to upgrade the “Sixtomat F” so got the Digipro F. Frankly it’s not much different and also uses a single 1.5V AA battery, although the ball–head diffuser is larger and can swivel fore and aft.
What I like is being able to use it vertically to read exposure values during measurement. What is annoying is the swivelling ball–head which sticks out the top, making it considerably longer than the Sixtomat. What I hate is having to unscrew the ball diffuser when doing reflected readings (with either the Luna–Pro or Sixtomat–Flash you slide the ball out of the way).
Again there is an updated “F2” version, with black buttons, red & white livery and a few additional cine features. Again I haven’t bothered upgrading.
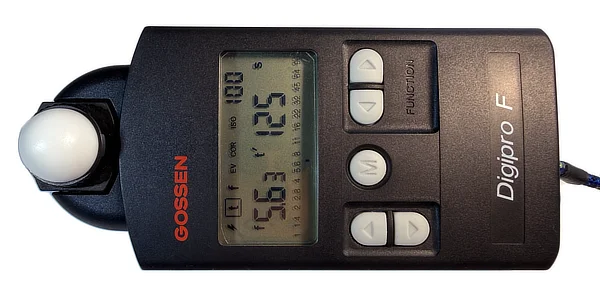
Most of the time I use the Sixtomat–Flash for everyday stuff, or the retro Luna–Pro F for B&W film. The Digipro F is mainly used for flash exposures due to its larger ball–head and vertical display.
Working with Flash
Lighting photographs is a huge topic, so will stick to a few things I have learned over years and will write a separate essay later. Maybe.
Section Quick Links
- Studio strobes
- Camera TTL flash
- Compact manual flashes
- Metering flash exposure
- Continuous light (tungsten & LED)
Studio Strobes ↑
When I started doing photography in the 1980s, everyone shot at 100 ISO or even 64 ISO. Studio flashes had to accordingly emit a lot of light to facilitate small apertures like ƒ8–11. Due to the intense bursts of light, portrait subjects during the first few flashes tended to flinch until they got used to it. Startled kids would cry. People regularly blinked at the moment of exposure.
Being film you couldn’t review shots to see if anyone baulked, so you had to shoot a lot of extra frames for insurance. One time, while waiting for my film to be processed at a pro lab, I saw a couple of 120 transparency film rolls on a light–table. They consisted of twenty–four almost identical 6×6 shots of a model in a haute couture hat. Clearly that photographer wasn’t taking any chances.
Because you required a lot of light, you had to use powerful strobes. For portrait work I would occasionally hire a pair of Elinchrom 250 Professional Monolight studio strobes, on stands with silvered umbrella reflectors. They were 240V mains powered and rated at ≈ 500W each, with enough output for ƒ11 at 100 ISO and “rapid” recycling times of ≈2 seconds. To shape the light I would run one at 75% output and 50% for the other, then use a small on–camera flash (an antique National PE–2006) to wirelessly trip the Elinchroms via their built–in slaves (as there were no radio triggers back then). The small flash also served as a catchlight to add sparkle to a sitter’s eyes.
Studio strobes had built–in continuous modelling lights, usually a 100W tungsten bulb, to approximate what the light was like. The flash output intensity was easy to adjust directly or with accessories. You could use the bare flash bulb with a small parabolic reflector for highly directional light with hard shadows; very dramatic and “Yousuf Karsh”. Or (my preference) bounce the output off a silvered umbrella interior for directional yet diffused light with softer shadows. For more diffusion run the output directly through white translucent umbrellas. Everyone uses enormous soft–boxes nowadays for maximally diffused light with no shadows. Boring IMO.
For photographing larger subjects, the sky (and budget) was the limit. Some strobes could be so enormous they were informally known as “fish fryers” or “swimming pools”. I never got to use one, although I did see a pair of “pools” in action once during a car shoot. Each strobe was the size of a billiard table and suspended above the car using cantilevered mini–cranes, while their floor power–packs were the size of hotel mini fridges…
Jump forward to today. Digital cameras can easily produce high quality images at 1600 ISO, so you can work at considerably lower output levels. In the Nineties I used “medium power” Guide Number 60 strobes with 100 ISO film. By contrast modern strobes at 1600 ISO can be dialled down to anaemic puffs of only GN 10 (!) Which results in more compact and portable monolights. If I was going down this road today, I would get the 3–strobe battery–powered Godox AD300/ 100 kit. Expensive but adaptable for any kind of work.
Camera TTL Flash ↑
The problem with studio strobes, even modern ones, is that they are bulky + heavy + a PITA to cart around and set up. They can also be overkill for outdoors work, especially if all you need is a bit of shadow fill to help separate subject(s) from background.
In the past I used auto thyristor controlled strobes which had built–in photo–sensitive circuitry to control the output. If you were shooting at (say) ƒ11 and needed flash exposure 3–stops down at ƒ4, you set this on the flash and its sensor would automatically truncate the output. Did this for decades on mechanical cameras with my compact Metz Mecablitz 32 CT2. In combination with a hand–held flashmeter, you could easily fine–tune the output to avoid screamingly obvious fill.
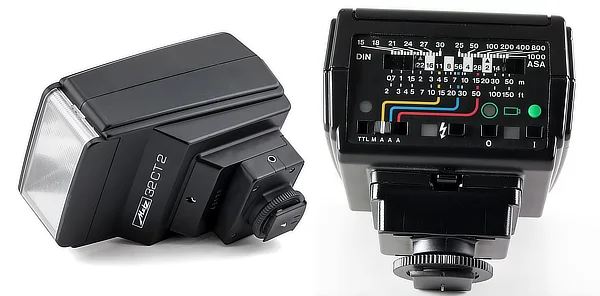
Which was more than twenty years ago. Eventually cameras were developed with built–in TTL circuitry to accurately control the flash output from within the camera. There were several caveats though:
- Each manufacturer had proprietary TTL protocols (+ hotshoe pin arrangements), forcing you to buy separate OEM flashes for each of your cameras: for me Sony & Leica
- TTL = reflected exposure measurements, with all its subject colour/ contrast reflectance issues
- Some of the TTL flashes were huge, sometimes larger than the camera
- It became dangerous to use older flashes like my “32CT2” on modern cameras, due to their higher flash trigger voltages potentially frying camera electronics whenever the flash went off (!)
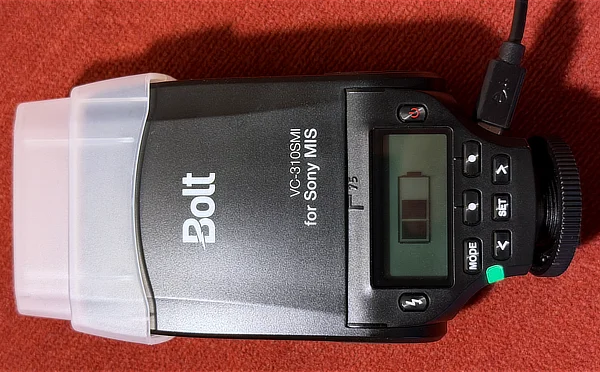
Clearly it was time to get a new flash. In 2017 I mainly used flash with Sony cameras, so I sidestepped the overpriced Sony models and instead got a compact Bolt–VC 310SMI. It has a GN 31 and worked well in TTL mode for all my Sony gear, that is until I got the (intentionally?) TTL–crippled α7RIV in 2019 🤬
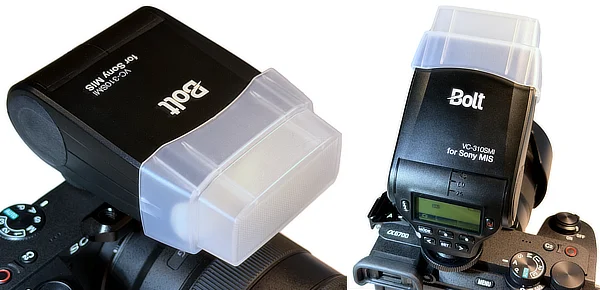
Luckily the “310SMI” works fine with my (retired) SLT-A77ii and new α6700, so I can still do TTL. It also can tilt upwards and rotate 90° to bounce light off walls or ceiling. Its protruding horizontal body greatly reduces shadows cast by lenses. Its raw output is quite harsh, like most flashes, so I always use the supplied diffuser attachment. An undocumented feature is being able to internally recharge two Eneloop Pro AA batteries via its Micro–B USB port (!), despite the manual saying it was for firmware updates only.
In 2024 I looked at the popular Godox V1Pro → for me too large & ungainly (+ fragile?) for an on–camera flash. In 2025 I looked at the Godox IT30Pro → much more compact, full TTL and built–in Godox 2.4GHz X wireless trigger. Unfortunately it’s a bit underpowered at GN 15 and you need an accessory “TR Hotshoe Riser” for tilt. Godox addressed this with their newer Godox IT32. Still a bit anaemic at GN 18, but looks promising. Since my more powerful “310SMI” (GN 31) continues to play nicely with the Sony α6700, will wait ‘n’ see if the new Godox TTL “iT32 & X5L” works properly with the Leica SL/ SL2.
Compact Manual Flashes ↑
The flash TTL vendor lock–in got everyone’s goat. It was (just) tolerable if you only used one camera brand or needed extended functionality. But for general use with all your gear?… Nup. There had to be a better way.
Fujifilm got the ball rolling in 2016 with the release of their compact Fuji EF–X20. Admittedly it was only GN 20, but in manual mode it worked with any camera. By using trial–and–chimp on digital cameras, you could quickly tweak the flash exposure to whatever you liked. A kludge, but it worked. Flashmeter people (ahem) did a single measurement and took the shot.
The EF–X20 was discontinued after a year apparently due to poor sales. Yet over time demand increased so much it can now fetch ≈ $US 1K on the 2nd hand market. That and Tom Ford/ Terry Richardson direct flash has become a thing again.
Godox noticed and released their Godox iM30 (GN 15) to soak up the demand:
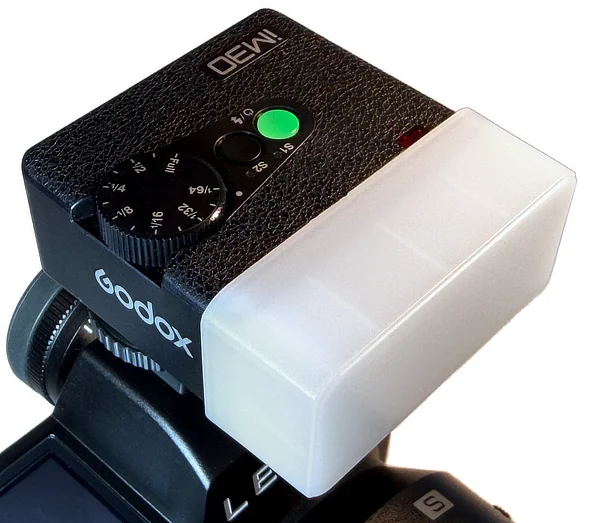
The iM30 is compact, surprisingly powerful and only requires 2× AAA batteries. Works with any camera since there is no TTL support (ie. manual only output). Alas it cannot tilt nor twist. I only use it at 1/64th power as a fill–flash for close to medium subjects, or as a catchlight to slave–trigger more powerful strobes. Similar to the Bolt 310SMI I recommend using it with a flash head diffuser (pictured), although unlike the Bolt you have to buy it as a separate “iM30–DF” accessory. My diffuser is actually an Moordiel generic thing, which I prefer as its translucent front panel is a bit farther from the strobe tube, yielding (slightly) softer light. I have also inserted a LEE 162 Bastard Amber gel inside the diffuser cavity to warm the output for nicer skin tones.
Metering Flash ↑
Monkeying around with strobes is a lot of fun, but to do it properly you need a hand–held incident flashmeter.
I learned this in the 1980s when working with film and manual flash. You never knew what you got until after the film was processed, so you had to nail it beforehand. How? Measure the flash output with a flashmeter and set the exposure accordingly. People who learned during the digital era tend to shoot in an iterative fashion until the exposure works. Which is fine, but also unprofessional when the sitter is waiting (im)patiently for you…
Thyristor and TTL controlled flashes made things easier, but the only way to do it reliably is by measuring the flash using an incident meter. No guesswork, reflectance or subject contrast issues. You directly measure the strobe light falling onto the subject and you’re done.
I have already written about my three flashmeters. Even if you baulk at their expense, use something. Don’t rely solely on camera or flash automation!
Continuous Light Sources? ↑
Time for another story:
In 1985 I did a few photos of UNSW friend “RB” for her modelling portfolio. Her flatmate “L” was impressed enough to commission me to take her portrait. Not any ordinary head–shot though, but rather a B&W “homage” to Greta Garbo in profile, taken by Clarence Sinclair-Bull to promote the 1931 movie
Susan Lenox (Her Fall & Rise).L wanted her portrait to be a close facsimile of the 1931 original. She even brought a bookmarked volume of Garbo Portraits to the shoot to ensure I stayed on task. You can probably guess “L” was formidable: 27–years–old, brilliant, confident, elegant, elusive, demanding and beautiful. I was a gobsmacked 21–year–old undergrad. Who was I to say no?
The best way to recreate the 1930s feel was by using tungsten lighting. Since I was part of the stage crew for the UNSW Law Revue, I borrowed a 250W Strand Patt 23 spot, 500W Strand Patt 123 “baby” Fresnel and a 1000W Strand 6” Fresnelite with barn–doors. I also hired lighting–stands from the Elizabethan Theatre Trust, purchased a roll of dark grey paper backing and set it all up in my Hurstville unit garage. During the shoot L reclined almost horizontally on a chair, letting her shoulder length hair dangle behind. I moved in close with my RB67 on a tripod and metered the scene using incident readings from my Lunasix 3. We only shot a couple of rolls — twenty 6×7 frames — and for a few of them I used a soft focus effect by stretching a black stocking over the 127mm lens. During the initial frames I said amusing things to put her at ease and make her smile & laugh, which she did often. But then she told me to shut up and added,
I don’t want smiling for this portrait, okay?Gulp.I placed the 250W spot on the ground behind her and pointed it up for a rim–light effect. The Fresnels were in front, with the main 1000W on my right and the fill 500W to my left. I also had an angled silver reflector on the ground for shadows. I didn’t have a dimmer rack, so had to rely on 1/R² to adjust the brightness by moving the lights back and forth. They were all plugged into the same 240V power board, yet the total 1.75KW at ≈7.5A was still within safe limits. It was seriously hot though, and we soon had to open the garage door for ventilation. We also had to take regular breaks to cool off and dab sweat from L’s face. Despite the trio of intense lights, the slow 50 ISO B&W Pan F film at ƒ16 required long exposures. Consequently L had to stay still and sometimes even hold her breath.
It was the first time I used continuous light for a photoshoot and it was a revelation. You could see immediately what the illumination and shadows were like. No more guesswork or hope or churning through packets of Polaroid instant print test shots or (worse) do a reshoot. Set up the light(s), measure the exposure, set the camera and… take the picture.
Small wonder a new generation of photographers greatly prefer continuous light, both in the studio and on location. It also dovetails nicely with video production: eg. the multitude of YouTubers and TikTokkers who use LED ring lights.
The tungsten–based rig I used in 1985 worked exceptionally well, but it was big and heavy and the heat it generated was something else. We were working with lights designed for overhead stage use, not at 1½ metres, and were both sweating like pigs despite it being the end of winter. I can imagine how tough things must have been for 1930s portrait photographers, with their massive studio Fresnels and carbon arc lamps. Half a dozen fans and a large towel anyone?
Thankfully heat is no longer an issue with modern LEDs. Output intensity is however. Aside from $10K film–rigs (eg. Apurture), prosumer LEDs emit far less light than any decent flash monohead. Thankfully dim output isn’t so much of an issue as most people now work at ƒ2.8 or wider, at 1600–3200 ISO. Yet if you want to stop down to ƒ11 at 100 ISO, then you gotta flood the photons and current (affordable!) LEDs cannot. Which is where flash still rules.
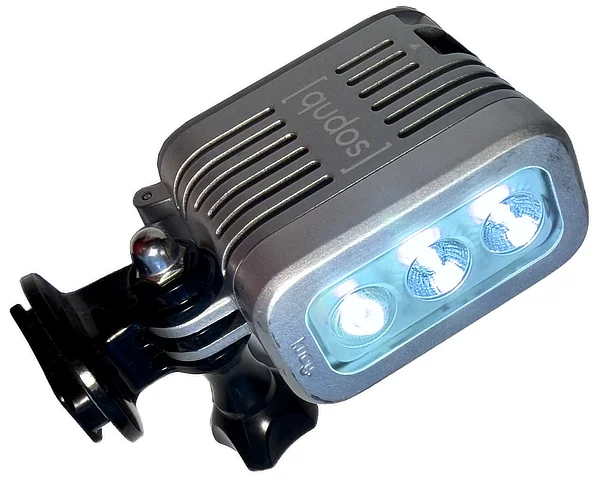
Nonetheless I have a cheap and small Knog Qudos Action LED lamp for quickie use: eg. as shadow–fill for the equipment shots in this article. It has a puny battery but the entire thing is so tiny it is easy to always have in your bag. Wouldn’t use it to illuminate a ballroom, but as fill for a face or small object, why not?
What about reflectors to tame shadows? Use ‘em all the time, especially outdoors when camera flash sync is too slow in bright sunlight. For decades I used homespun things like crumpled aluminium foil or gold mylar stuck onto cardboard. I currently keep a tiny umbrella in my Sputnik
camera trolley because it unfolds into an 80cm concave silvered surface. Additionally, you can now buy flat reflectors which fold away into small portable sizes, eg. the XLite 105cm folding reflector kit. If you can do without the supports, the reflectors alone are relatively inexpensive.
So what happened to L’s portrait?…
A few days after the shoot we reconvened in the art deco lounge room of RB’s flat in Bellevue Hill. I brought a couple of contact print sheets and L thoroughly examined each 6×7cm direct print with a large magnifying glass. RB was astounded by the results and half–jokingly said she was jealous. L was more circumspect. Out of twenty frames she eventually selected only one, and marked it with a neat black cross in its top right corner. I encouraged her to choose a couple of alternatives, but was summarily overruled.
She then issued instructions on how she wanted the image enlarged and printed. I was to crop it into a square ratio and print it at a 45° angle, since she intended to have it mounted as a diamond shape to suit the art deco theme she was after. She emphasised she wanted to avoid anything conventional. I warned her the print wouldn’t be very large, maybe only 8×8”, but she said it was fine as 1930s prints she had seen weren’t enormous either. If anything the small size would make the picture look more like it was from the era she wanted to mimic. I was to supply the completed print while she would look after the mounting and framing.
Then came the awkward part: she insisted I hand over the negatives once the print was done. I baulked. It would be like a composer handing over their only copy of the score! She calmly responded with a number of reasons, some sensible (another photographer had dudded her in the past) some paranoid (she was worried I would sell prints without her permission) and some based on Attractive Young Woman Privilege (it was what she wanted and that’s that). She looked me in the eye with an imploring expression, grabbed my hand and… I caved. She gave an impish smile, which stabbed at my heart, let go of my hand and promised $100 on top of my fee. The following week when I handed everything over, she paid in full and seemed pleased.
A month later a cocktail party was held to celebrate the unveiling of her new portrait. I was (belatedly) invited and the tiny apartment was filled with her top–tier associates. Her teak–framed photograph hung as a 12×12” diamond on the wall, harmoniously matching the art deco surroundings. Guests emitted
Oohs!andAahs!andI have to get one just like it!as they drifted past and delicately sipped their champagne. I became embarrassed. After a while L, dressed impeccably in a dark satin suit over a cream silk blouse, asked for silence and gave an informal speech about the portrait and how much Garbo meant to her. She spoke softly and at length, but completely omitted any mention of the bloke up the back who made it all happen. He who trekked across Sydney without a driver’s license to arrange the lighting, then took and processed the photo(s) and sweated in a red–lit darkroom while he dodged & burned & selectively developed lighter portions of the Ilford Galerie print, by rubbing his bare fingers all over her face’s image while it was still immersed in the developer tray solution. Nor did she mention him inhaling concentrated selenium toner fumes, nor the hours of meticulous print washing & drying nor the entire evening he spent obsessively spotting and highlighting the dried print with archival retouching dyes.People sighed. People laughed. I left. What could have been a small early triumph instead became a lifelong object lesson in what to never do again [ Note V ].
PN&T — Parts 1 & 3
Previous → Part 1: Film cameras, 35mm & 120 medium format
Next → Part 3: Digital cameras & photography
Copyright — All Rights Reserved ↑
Unless noted otherwise, everything in this article is and remains the sole copyright of its Australian author.
Although you are permitted to view this material online, no other use, reproduction or implied license is allowed without the author’s prior written consent.
The internet may still be free, but intellectual property is not.
Notes ↑
- By way of comparison, the flash X–sync speed for the Nikon F2 & F3 is 1/80th, a slight improvement over 1/60th for the Nikon F. My “modern” M6 TTL syncs at 1/50th although the Nikon F4 & F5 and Leica R9 are all at 1/250th. The 50MP Sony α1ii can sync at 1/400th, yet Hasselblad, Rolleiflex, Mamiya and other leaf lens cameras achieved 1/500th in the 1960s. They are all brushed aside by the 2024 global–shutter 24MP Sony α9III, which can sync at 1/80 000th → [return]
- Land, E. (1977)
The Retinex Theory of Color Vision
Scientific American (PDF) → [return] - I am aware the ECN–2 process Kodak Vision 3 motion picture stock lacks an orange mask: eg. 50D, 250D, 200T, and 500T. Unfortunately it is limited to 35mm format, although if you have nothing better to do you could roll your own medium format film via 65mm Type II perforated in Hasselblad 70mm cassettes, using an “all–perf” modified A70 film back. This is hypothetical anyway, since Kodak cracked down on reselling re–spooled motion picture film in Feb 2025 → [return]
- Purchased my Sigma AML72–01 magnification filter for $AUD 14 from BHPhoto online. You can also get it from Target USA for $US 18. Sigma Australia lists it for $AUD 208. Make of that what you will → [return]
- Discovered years later that “L” owned full copyright to the image(s) as per the Australian Copyright Act (1968) circa 1985. We could have varied this by written agreement, but we didn’t. She never had rights to the physical negative though, but I would have required permission whenever I wished to reproduce the image(s) for (say) a website or exhibition. See the Copyright Discussion in my “NSW Photographer’s Rights” article elsewhere on this website. BTW not sorting out copyright/ ownership remains a common problem even today → [return]
A few C–41 development notes:
- See
How to choose a C–41 kit (and which ones to avoid)
(2026) at YouTube for a good overview of current C–41 home development kits. Unfortunately Tetenal kits aren’t mentioned because… - Tetenal had a near–death experience in 2019. They temporarily managed to survive, but since 2023 appear to have gone out of business. Nevertheless B&H Photo–Video still stock #T109306 C–41 press kits for $US 65, each (!)
- Over the years many people have mentioned using aquarium heaters for developer temperature control. Unfortunately most of these things (unsurprisingly) cannot reach 38°C nor work at the ±0.1°C precision required. Have since discovered Westinghouse Sous Vide immersion water cookers, which appear to solve the finicky temperature requirement. There is also the more specialised Cinestill TCS water heater with two built–in bottle holders, which does the same job but for considerably more $$s.
- See
Original Version 6 February 2026 — all rights reserved